Professional make-up is not only the prerogative of fashion stylists. With step-by-step photos, time, necessary tools and cosmetics, it can be easily done at home.
What tools and materials are needed
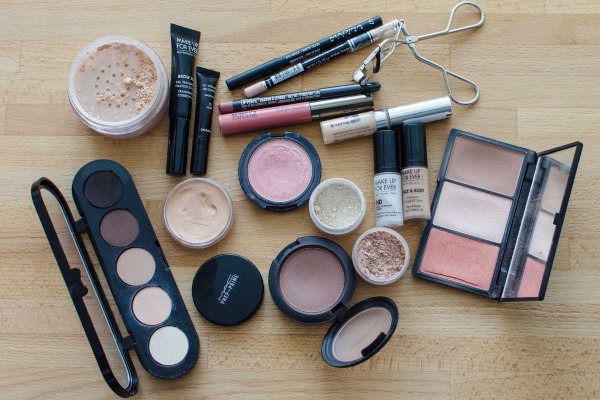
Professional make-up at home (step-by-step photo instructions are posted below) cannot be done without high-quality cosmetics and the necessary tools for applying it.
Skin is a canvas that must look perfect, so that the makeup is natural and beautiful.
To achieve this goal you will need:
- Primer (or makeup base). It is needed so that the tone and all other cosmetics lie flat on the skin and hold for a long time. The primer has a slight coloring effect and protects against wind, sun and frost.
- Tone cream. It can be matte and with a slight shimmer, allows you to hide skin imperfections and even out the tone.
- Point corrector. This product is available in the form of a compact liquid and pencil and has the same function as a foundation, but in cases where minor imperfections need to be hidden - pimples, redness, age spots or mosquito bites.
- Concealer. It is mainly used for delicate eyelid skin and helps not only to protect it, but also to create a more durable eye makeup with shadows and pencil.
Professional stylists recommend that make-up emphasize either the eyes or the lips. This approach will allow you to look stylish and natural, and not vulgar.
For eye makeup you will need:
- ink, preferably brown or black (other shades are not excluded);
- a liner or pencil to highlight or correct the line of the eyes and eyebrows;
- eyeshadows of various colors matching the color type.
For a stylish lip makeup you need:
- lip gloss and lipstick;
- a nude liner to create a clear and even border between lips and skin;
- eyeliner to match the lipstick to correct the shape and curve of the mouth.
With this set of cosmetics, you can create great makeup.
But it won't be complete without:
- blush;
- powder;
- eyebrow pencil.
To apply all of these products, you need tools specially designed for them. Some of the items can perform one or several functions and even interchange each other.
But stylists recommend purchasing professional tools.
These include:
- applicators - used to apply cosmetics with a dry texture;
- sea sponges - used for applying creamy cosmetics;
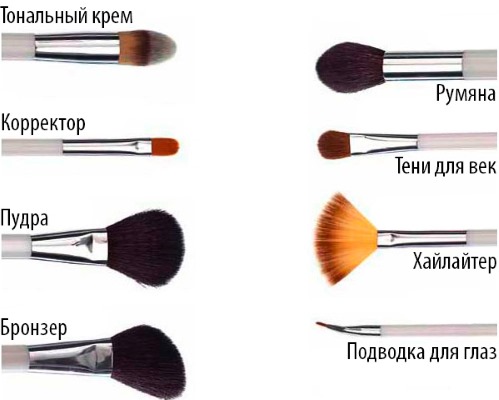
- brushes of various shapes and types, at least 3 pieces in a set;

A variety of brushes are needed for professional makeup. - pencil sharpener;
- sponges and puffs - used when applying tone or powder;
- eyebrow brush with comb and tweezers to shape the eyebrows;
- eyelash curler.
If during the application of the product something went wrong, instead of completely removing the composition and completely redoing the makeup, you can use additional products.
These include:
- cotton pads and sticks;
- a pack of dry and wet wipes.
Instruments should be carefully looked after and washed with warm water and hypoallergenic soap at least once a week. This practice will prolong the life of the items and prevent skin diseases.

 Don't miss the most popular column article: Face fitness for face contour lifting, rejuvenation, muscle tone. Master class from Elena Karkukli
Make-up sequence
Professional make-up at home (step-by-step photos and videos below) is impossible without observing the correct sequence of application of funds.
Recommendations:
- Tone cream. It can have a thick or light texture. The first type is designed for girls with problem skin, and the second is suitable for girls with normal skin. Apply a dense foundation with a brush and a light foundation with a sponge.
- Corrector. Depending on the color, it can be used not only after applying the foundation, but also before it.
- Emphasizing cheekbones. A bronzer comes in handy for this step. Liquid and cream bronzer is suitable for those who are mastering the basics of professional makeup, while powdery bronzer is recommended for experienced ones.

- Powder. Apply funds to the area below the eyebrows with a movement from top to bottom, and on the forehead - horizontally and down. For girls with oily skin, it is better to give preference to compact matting products. Owners of normal skin can use loose powder. And girls with dry skin can skip this stage in the makeup procedure.
- Eye, eyebrow and lip makeup. This type of makeup will be discussed below.
- Makeup for cheeks with blush. To make the blush lay down beautifully, you need to smile broadly. This tricky step will smooth out the creases of your cheeks and create great makeup.
How to properly prepare your face
Makeup artists who work with Hollywood stars recommend preparing your skin for makeup in 3 important steps:
- Exfoliate old cells with cleansing products with a gentle composition in the form of acids and enzymes. Such preparations are suitable for girls with oily skin. For those with normal or dry skin, use lotions and toners. In this case, scrubs and peels are not recommended for use, as they dry out the skin.
- Moisturizing with a moisturizing (never greasy) cream. The texture of the product should be light and pleasant to apply. You can apply it in a thick layer, and wipe off the excess with a napkin after absorption.
- Application of a primer. It allows you to tighten pores, add radiance, and give the skin a matte color by leveling the relief and tone.
Definition of makeup shades
Professional makeup, despite the fact that it is done at home using step-by-step photos, must fully correspond to the original - even if the application technique is correct, and the cosmetics are of high quality, but the color is incorrectly selected, this make-up can hardly be called professional.
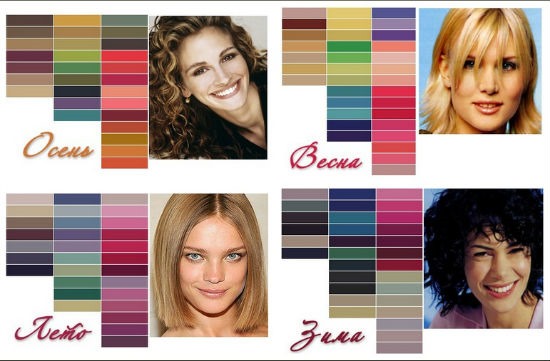
To avoid this gross mistake, makeup artists recommend learning the basics of color combinations, starting from your color type:
- for girls with an autumn color type, makeup artists recommend a red, yellow, orange, golden and chocolate palette;

- owners of the features of the spring color type need a yellow, greenish, orange, yellow and pink palette of colors in makeup;
- girls with a winter color type are better off giving preference to cold shades of blue, pink, emerald, light blue and charcoal gray;
- owners of the summer color type will suit purple-pink, gray-metallic, blue-blue shades.
Tone equalization
Step-by-step photos will help you make professional makeup at home. And first of all, you need to create the right skin tone. For these purposes, you can use a foundation, foundation or moisturizing tinting agent.
Makeup artists recommend purchasing two tones: one light for the cold season and dark for the warm one. In the spring and fall seasons, the two colors can be mixed. When choosing a tone, one should focus not only on the complexion, but also on the neck, so that when applying the product there are no obvious transitions or a mask effect.
First, apply the makeup base. This can be done with the pads of your fingers or with a sponge. After application, you need to blot the excess with a dry cloth. Then the foundation is distributed.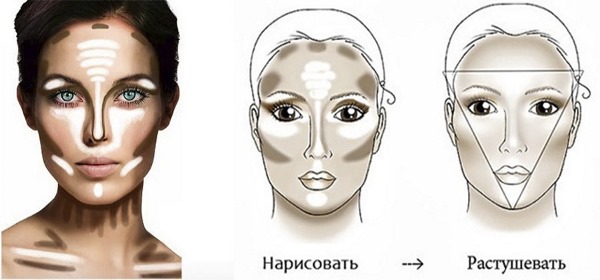
This can be done in two ways:
- Professionals use a special tone brush. This can be a straight or rounded bristle tool and a kabuki brush. To do this, squeeze a little of the product onto the back of your hand, take some of the tone with a brush and apply it with patting movements until the entire face is covered with an even tone. At the end, you can go with a brush without means along the massage lines.
- The second method is with a damp sponge. To do this, you need to wet it and squeeze it well so that excess moisture goes away. After that, you need to apply a little foundation on it and distribute the product over the face. In no case should you apply the foundation with a dry sponge, as the cream will be absorbed into it due to the lack of moisture and more funds will be required than necessary. As a result, you will get a dense and uneven layer of foundation instead of a thin and perfect one.
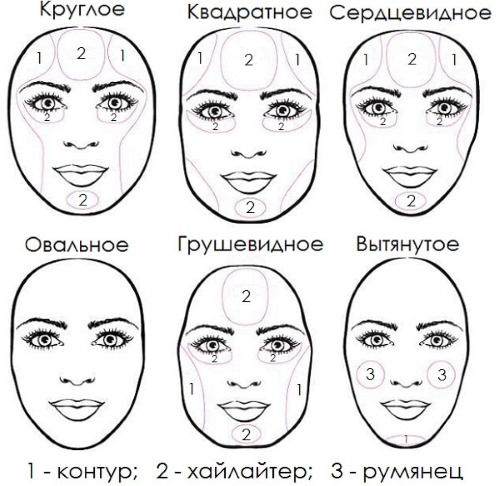
Face reshaping
The main purpose of make-up is to hide skin imperfections, turning them imperceptibly to others into advantages. One of the disadvantages can be the shape of the face. The ideal shape is oval. Therefore, girls with a different face shape are trying to get closer to the ideal.
For correction, you will need two tones and two powders - both types of funds should be one tone darker and lighter than the natural shade.
Advice:
- To visually make an oval square or round face, you need to apply vertically light and dark foundation from the side from the temple to the chin. You need to start from the hairline and light color. It is recommended to darken the selection. The product is shaded with a brush.

- To give an oval shape to an elongated face, you need to apply a dark and light tone horizontally. The lighter tone is applied to the top of the nose, cheekbones and chin. A dark tone is needed for the lateral surface of the cheekbones and temporal zone.
- To give ovality to a triangular face, darken the temples and the side of the cheekbones. Apply a light shade of foundation to the chin. Blush is applied to the top of the cheekbones.
 Don't miss the most popular column article: Facial massage according to the system of the Japanese doctor Asahi Zogan.
Eyebrow shaping
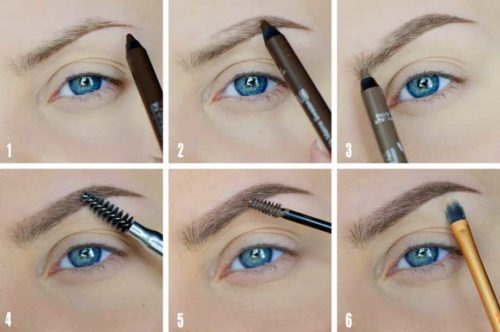
Professional make-up at home (step-by-step photos will help you make a make-up according to the rules) includes the stage of working out the eyebrows:
- Correction of the natural shape. At this stage, you need to remove excess hairs. If you have the skill, you can use thread or wax. But tweezers are best suited for these purposes. Correction of the shape should be carried out in daylight and the procedure should be started from the side of the temples. The trend is the natural shape of the eyebrows of medium thickness with a bend, and not thin threads.
- Eyebrow makeup. It can be done with a pencil. if naturally sparse eyebrows or leave their natural shape and color, if the eyebrows are thick. To begin with, you need to define three points: the bend, the beginning and the end of the eyebrow. It is very easy to do it yourself. For this you need a pencil. You need to attach a handle at three points: at the wing of the nose and the beginning of the eyebrow, at the wing and the end, and through the pupil. The first two points are the beginning and end of the eyebrow, and the third is the bend. If you have thick eyebrows, you need to get rid of excess hairs. Using the eyebrow brush, you need to comb the hairs up and trim the length with nail scissors. Then you should remove the excess from above with tweezers. If the eyebrows are sparse, then using a pencil that is as close as possible to the color of the eyebrows, using point movements, starting from the beginning, draw a line to the end from above and below.The space between the lines is painted over with point movements that simulate hair growth.

Drawing eyebrows with a pencil takes a long time. Therefore, this method can not always be used. You can replace this step with eyebrow tinting. When choosing paint, you need to focus on their natural color.
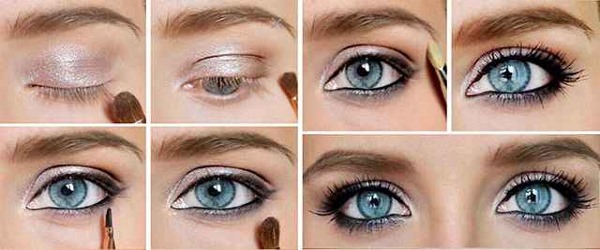
Eye makeup rules
Professional eye makeup at home (step-by-step photos will serve as a support) can be made exciting or mysterious. The skin around the eyes is very delicate and makeup in this area requires a special approach.
It includes:
- Foundation application under the shadow. This step will keep the shadows bright throughout the day or evening and keep them from rolling away. The base is cream and powder. The first type is hammered in with the pads of the fingers. The second is applied with a special brush in two layers. The step is completed by applying powder.
- Applying a corrector or concealer. Their function is to remove bruises under the eyes. If they are faintly noticeable, then you can use a corrector a couple of tones lighter than the skin. If this method did not help and the bruises are still visible, then a concealer of a shade close to yellow for owners of light skin and shades of orange for girls with dark skin will come to the rescue. Only after applying a concealer or concealer is the foundation applied.
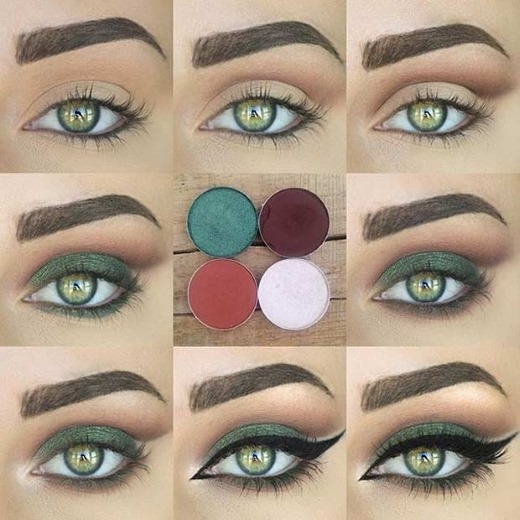
- Applying shadows. The way they are applied depends on the type. Dry eyeshadow is applied using the applicator, which usually comes in the kit. Liquid shadows are applied with a brush. The first type of shadow is suitable for beginners, the second - for girls who have the skills to handle such a tool.
Make-up shades should be selected suitable, depending on the color of the eyes:
- Perfect eyeshadow colors for brown eyes and blonde hair are saturated cold (bright blue, fuchsia, sea green). For girls with black hair and brown eyes, a dark blue eyeshadow palette is the right choice. If the brown-eyed beauty has dark skin, then it is better for her to give preference to the olive-brown range. Stylists recommend Oriental-style makeup to girls with brown eyes. It implies the presence of black eyeliner, which draws a thin line along the upper and lower eyelids. The look will be completed with shadows of a suitable color and mascara.
- Girls with green eyes it is worth opting for brown, copper, pink, green, purple and lilac shades. Stylists do not recommend using a blue eyeshadow palette, but they advise giving preference to a deep blue outline, which should be emphasized by the inner eyelid. As for the eyeliner, instead of black, choose a gray, chocolate brown, white and gold pencil. The last two colors will help to visually enlarge the eyes.

- To blue-eyed beauties stylists recommend paying close attention to pink, silver-gray, gold, purple, charcoal-gray shades. The latter range is ideal for evening make-up. If you want something unusual, then you can use the blue-blue palette. As for the eyeliner, it is purple, emerald, cobalt, terracotta, bronze. You can choose not only black mascara, but also color - the main thing is that it is combined with eyeliner and shadows.

- Owners of gray eyes stylists recommend paying attention to shadows, a couple of tones darker than the iris of the eyes. This advice is suitable for all gray-eyed girls, regardless of their color type. If the girl has gray-blue eyes, then it is better to choose gray-blue, steel, gray-beige and dark gray shades. The golden brown and beige palette will suit girls with a warm shade of hair and orange splashes on the iris. For brunettes with gray eyes, it is better to abandon the orange and yellow palette, but you can choose any other colors. Depending on the color type, you can choose black, brown, blue or gray outline. The main thing is that the line is thin and clear.As for mascara, they choose blue, gray, black, plum shades for daytime makeup and with shimmery pigments for evening makeup.
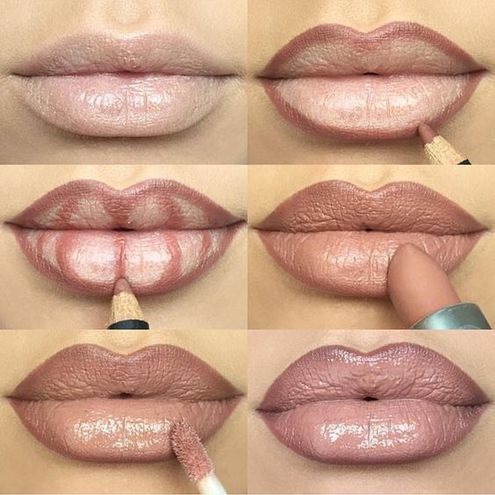
Lip makeup
When making up lips, girls are usually limited to applying lipstick or gloss. This is not enough for a professional make-up.
Star makeup artists advise doing it in the following order:
- Peeling. This step will get rid of the dead skin, disperse the blood and thereby enlarge the lips and give them a natural bright color. For this purpose, a mixture of honey and sugar or a toothbrush is suitable.
- Balm application. It will help moisturize your lips. This step should be followed not only in winter, but always. After 5 minutes, you can apply lipstick or gloss.

- Contour drawing. This step is usually skipped, but is necessary if you are using bright lipstick or if you need to tweak the lip shape. It will also allow you to give lip makeup lasting, as the lipstick will not spread beyond the created conditional boundaries. The shades of pencil and lipstick should be the same.
- Applying lipstick. Makeup artists point out that the lipstick should be applied from the center to the edges.
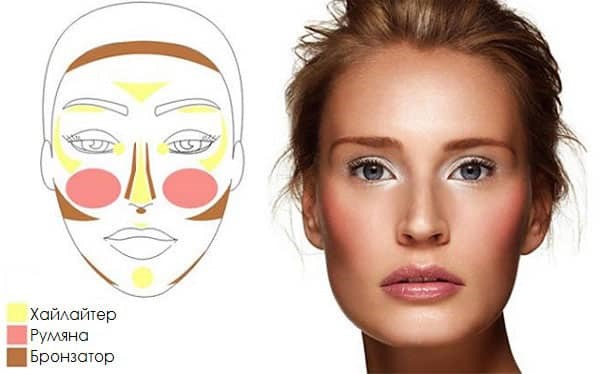
Blush and highlighter
Blush and highlighter finish off the makeup. The function of both means is to highlight some facial features. Blush is applied to the apples of the cheeks or cheekbones. To do this, you need to smile broadly and apply the product with a wide brush on the protruding parts of the face.
A highlighter is used to brighten the face and give it a subtle glow. The product can be liquid, cream, in the form of shimmery powder, colored balls, pencil or stick with a brush. The highlighter can be applied to the nose, upper cheekbones, lips, eyes and under the eyebrows.
In no case should it be applied to all specified points at the same time, only to one. For example, on the wings of the nose, if you want to lengthen it, or on the zone from the bridge of the nose to the tip, if you want to reduce it. As you can see from the above photos, you don't have to be a star makeup artist to get a high-quality and successful professional makeup.
Even at home, this is quite doable. To do this, you need a set of high-quality cosmetics that is suitable for the color type of appearance and the step-by-step actions described in our article correctly performed.
Article design: Oksana Grivina
Video on how to do professional makeup
How to make your makeup perfect, what mistakes should be avoided:
I'm just learning how to do this makeup) Thanks for the detailed instructions.