It is possible to qualitatively build up nails with gel at home. To do this, you will need to buy materials and learn the stages of building. The Internet contains a list of required materials.
There is also a step-by-step guide for beginners, lessons with photos, videos on how to build up at home, the stages of a jacket and drawing, existing new items and design varieties.
Variety of gels for nail extension
There is a wide range of gels for nail extension at home. They exist in a transparent or camouflage form, with shades of pink or beige, stained glass and colored.
All gels differ according to a specific extension pattern:
- Single-phase: contain base, modeling and protective formulations. Easy to apply to the nail. The consistency is liquid. Better to apply to novice craftsmen.
- Two-phase: the consistency is the most dense. When using them, 2 means are used separately - the first main layer and the second sculptural one.
- Three-phase: when applied, the layers are applied in 3 stages - initial, sculptural and protective. The third of them ensures the safety of the nail for a longer time. Widely used by experienced craftsmen.
There are a lot of manufacturers of gel for nail extension that can be applied for independent use.
The most popular ones are:
- IBD gel. Made in the USA. Does not provoke the development of allergies, acid-free, no pain during drying, neutral smell. It consists of natural ingredients, thanks to which the nail is protected and also nourished. There are no problems with application. This manufacturer produces a variety of types of gels. One of them is IBD Bonder Gel: not thick, self-leveling, hardens under a lamp in 60 seconds. The structure of the nail does not deteriorate, it is able to firmly adhere to the surface, the nails do not turn yellow. Price RUB 800 Volume 14 ml.

For gel nail extension at home, it is recommended to use only high-quality materials, for example, IBD - Formula Profi gel. Russian manufacturer. Among the assortment produced by the manufacturer, there is a Formula Profi gel base. The cost is 590 rubles. Liquid, adheres well to the nail surface. It hardens under a UV lamp in about 2 minutes.
- All Season Gel. Made in the USA. Among its products, it is worth highlighting: Shimmer Gel from All Season. The cost is 1210 rubles. Volume 28 gr. The composition contains sparkles of silver color. Used as layers applied in the second or third stage. Dries up in 2 minutes.
- Runail Gel. Production Russia. Among the products we can mention a transparent gel with an orange tint. The cost is 205 rubles. Volume 7.5 gr. High viscosity, dries up in 1 min.
- Gel Global. Made in the USA. Among the manufactured products there are single-phase and three-phase gels.Global gel sets (12 pcs.) Are also available. The cost is 1,500 rubles. The jars contain several different colors.

Extension techniques
Gel nail extension at home will come to the rescue when it is impossible to grow your own nails.
There are several methods:
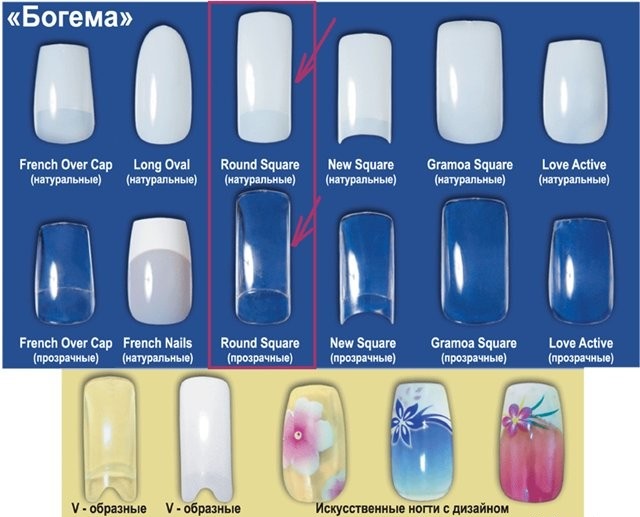
1.With tips... It is based on fixing the tips with a special glue. They are produced in a variety of sizes and shapes. They can be white, transparent, or colored. After the bonding step, the tips are sawed off to create the required length and shape. Then the stage of distribution of the gel or acrylic begins, which are polished after application. If necessary, you can apply a drawing on top.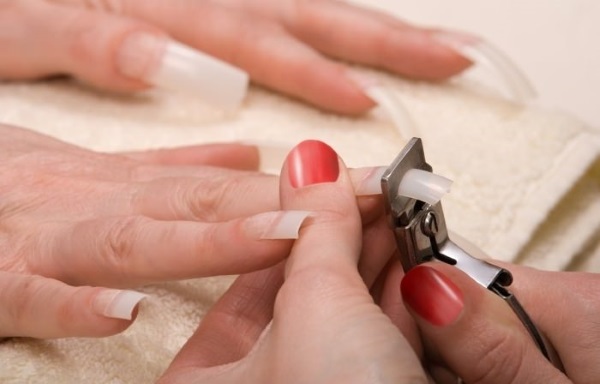
The advantages of such a build-up include:
- less painstaking work than on forms;
- building takes less time;
- more suitable for people with large fingertips;
- good for brittle nails.
Among the disadvantages of this method, it is worth noting:
- nails look less neat;
- tips do not allow you to create some forms;
- not subject to compression, which makes them very thick;
- will make the wider nail plate wider.
2. On the forms. There are 2 types: disposable paper and durable metal. First, the form is attached to the edge of the nail, which is free, and then covered with material. When the applied composition is dry, the form is removed and the length is formed with a file. Then the nail is polished and fixed with a product.
Pros of using forms:
- outwardly, the nails look more natural;
- it is possible to give the nail plates a variety of shapes.
Disadvantages:
- duration of the process;
- the price is much higher.
Also, nail extension methods are divided depending on the material:
1.With acrylic. This material dries quickly, so it is necessary to develop a certain skill in working with it.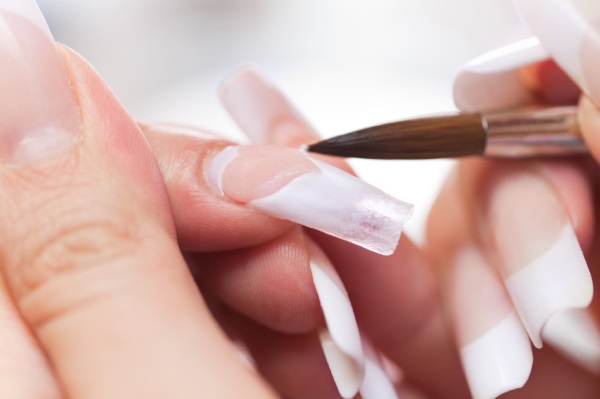
The advantages of building up using acrylic are:
- strength, can last up to a month;
- look natural.
The disadvantages of acrylic coating are:
- pungent and unpleasant odor;
- worsens the condition of the nail.
2. Extension with gel. More than half the gel consists of coniferous resin. Dries only under a UV lamp.
The advantages of this build-up include:
- environmental friendliness of the material;
- the throughput of air and moisture, so your own nails do not deteriorate;
- it is possible to create a variety of beautiful drawings;
- the lamp prevents the spread of fungal diseases.
Among the cons are:
- fragility;
- a damaged nail cannot be corrected.
Rules for choosing a method of nail extension
Gel nail extension at home can be done in several ways.
There are many reasons that influence the choice of a suitable method, for example, the shape of a natural nail:
- Normal - are almond-shaped. Any method can be applied to them.
- Trampoline characterized by a small nail plate. It is worth choosing tips here. They must be taken with a more shaped arch, with a bend and not a wide area for contact.
- Nails from flat plate. Both methods are possible.
- Downward growing nails. The most suitable way is using forms.

- Bitten nails. For this look, tips with a small area for connection will be most suitable.
Nails on forms: what you need
Performing a manicure requires some items:
- forms for building;
- Ultraviolet lamp;
- brushes for distributing the gel;
- modeling gel;
- primer;
- degreasing agent;
- files and buff for nails to shape and smooth the surface of the nails;
- fixing means;
- scraper (pusher);
- disinfectant solution;
- an anti-sticking agent;
- lint-free napkins;
- cuticle softening oil.
Using tips
Extension of nails with gel at home on tips requires that:
- a tool that will soften the cuticle;
- scraper;
- file and polisher (buff) for nails;
- tips;

- tips cutter;
- glue for gluing tips;
- gel;
- Ultraviolet lamp;
- brushes for applying gel;
- an anti-adherent layer;
- lint-free napkins;
- disinfectant;
- primer (promotes better attachment of natural nail and gel);
- nail-rub (means preparing the nail for the application of the gel);
- means for removing excess fat from nails;
- cuticle oil.
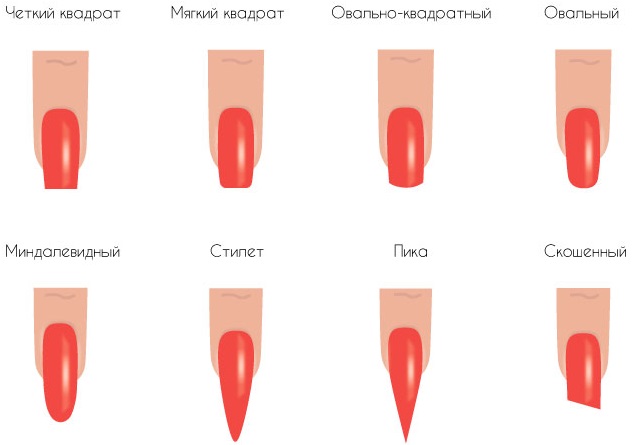
Classification of nail forms
Nails can be given various shapes:
- square - look good on long fingers. Their corners are without rounding. They are considered to be the easiest to implement;
- oval - the edge of the nail reflects the cuticle. They correspond in shape to an oval and have no corners. More suitable for narrow and wide plates;
- squawal - oval-square shape. There are shaped corners and a slightly rounded edge that does not represent the cuticle area;
- almond-shaped - there are no corners, the edge rounding at the ends is greater than the cuticle line;

- stylet - an acute angle without rounding is formed in the center of the edge.

 Don't miss the most popular column article: How to build up your nails with gel polish. Instructions for nail extension for beginners. A photo.
Preparatory process
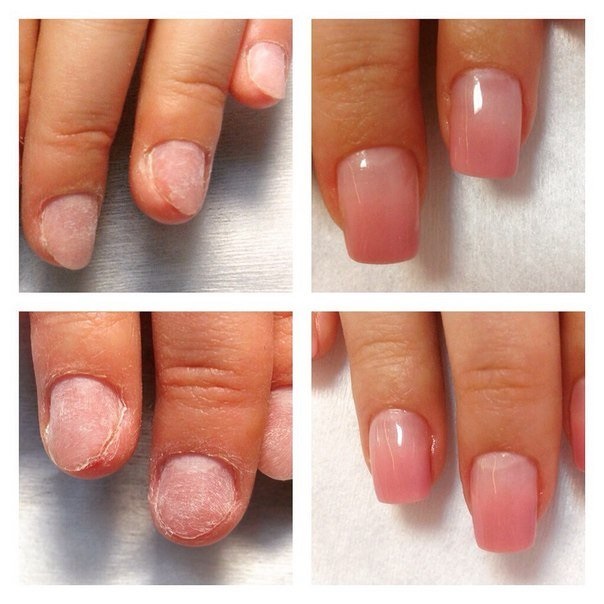
Gel nail extension at home involves preparatory measures. Such preparation will allow for better build-up, avoid brittle nails, detachment and infection.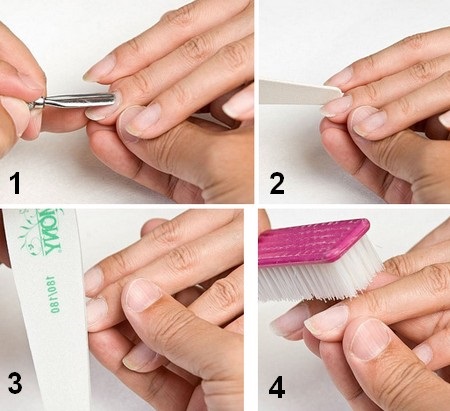
This preparation includes several stages:
- Hands are washed and treated with a product.
- The cuticle is softened with a softening agent. It is rubbed into all fingers. Next, the cuticle is pushed back with a scraper.
- Give the required shape to the nail plates.
- The nail plates are polished with files with abrasiveness not less than 240 units. Polishing is done in the direction of nail growth. Dust is removed with a brush. Then disinfection is carried out with special means. They exist as a spray, liquid solution, or wipes. Such preparation is sufficient for high-quality build-up.
Stages of self-building
During the extension of the gel, the following actions are performed:
- Hands are treated with an antiseptic.
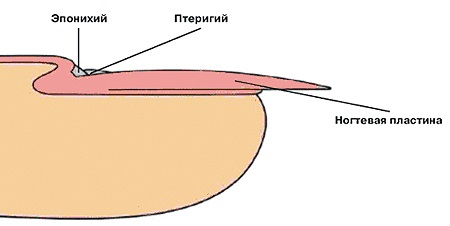
- Cuticle and pterygium (film on the nail surface) are removed.
- Use a file to form the outer edge of the nail and remove the gloss from its surface using a buff (a file in the form of a bar). The length of the nails should be at least half a centimeter to fix the shape.
- Brush off dust.
- Eliminate traces of fat with a dehydrator.
- Distribute primer adhesive.
- Spread the initial gel layer, the thickness of which should not be more than 3 mm. Then dry for 3 minutes. under the lamp.
- Fix the shape. To attach a paper form you need:
- remove the middle and glue it from the inside to the area where the material will be applied;
- make an oval shape;
- a more twisted shape will make it easier to fix;
- attach the form in such a way that it is a continuation of the nail;
- clasp your finger with your ears;
- the edge of the nail should be cylindrical, corresponding in diameter and size to the nail.
For a high-quality result, it is necessary to fix the shape so that there is no space between them. Otherwise, materials will leak, which will make it thicker.
The gel should be applied in a specific sequence: first, 4 fingers on one hand, then 4 fingers on the other hand and at the end of the thumbs.
Creating a nail from gel. The shape and the nail are divided into zones:
- cuticle area - a third of your own nail;
- the contact area of the nail and the mold is 2/3 of the nail plate, a third of the mold is the stress area. It has the greatest load;
- the rest of the form area.
A thin layer of gel must be applied to the cuticle area. The thickness of the application of the gel becomes greater when approaching the stress zone.The place of contact must be covered with gel most abundantly. The outer edge is not created with a thick layer of gel. After gel application, it is cured under a UV lamp.
- The sticky layer is removed with a special tool, and then the nail is filing to level its surface. Also, a shape is created with a file.
- Then the camouflage gel is distributed in 2-3 layers. The layers are dried under a UV lamp.
- Surface spreading of the final coat. Hold for 5 minutes. under the lamp.
- The sticky layer is removed.
- The cuticle is moistened with oil.
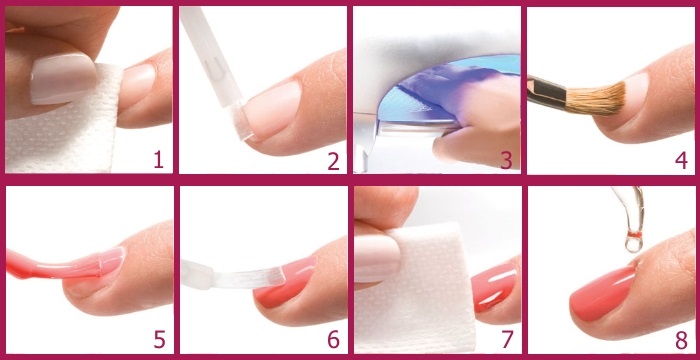
Stages of building up using tips
Gel nail extension using tips at home is as follows:
- Hands are treated with an antiseptic spray.
- Soften cuticles and push back with a pusher.
- Remove excess fat with a degreasing agent.
- The outer edge of the nail plate is sawed off to obtain a shape.
- Buff to remove the top layer of the nail. Movements are made in one direction and are carried out until a milky-matte shade is achieved.
- Remove dust with a brush.
- Remove excess fat.
- Select tips that fit the shape of the nail. A number of principles should be followed:
- the width of the tips should be the same as that of your own nail;
- the shape from the outside of the tips should match the inner groove of the nail;
- the plastic nail must completely cover the natural nail.


- Stick the tips to the nails. The glue is spread with a brush on the inside of the tips over the entire surface. Tipsa leans against a 45 degree angle. First, it is leaned against the edge of the nail, and then against the surface. Keep pressed for 10 sec.
- Remove unnecessary length with a tip cutter, leaving a margin.
- The nail is filed and the border of the nail and tips is gradually smoothed out so that the line is invisible. The natural nail does not touch. The file should be 100/80 grit. The surface of the nail should be smooth without steps.
- Remove dust with a brush and spread the nail prep onto your own nail (a product that prepares the nail for the distribution of the gel).
- Primer is applied before evaporation.
- Apply the gel in a thin layer and dry in a UV lamp for 2-3 minutes.
- The next layer of gel is spread on the contacting part and dried under a lamp. For even distribution of the gel, the hands are kept upside down.
- The sticky layer is removed.
- Form a shape with a file and polish with a buff. Remove dust with a brush.
- Cover your nails with a top product.
- If you need to make a design.
- The cuticle is lubricated with oil.
Possible mistakes
Erroneous actions during nail extension lead to material waste and the appearance of pockets. These phenomena are associated with incorrect modeling technology or poor preparation of the nail.
The most common mistakes are:
- poorly removed pterygium, which leads to the appearance of pockets. Even the smallest particle of it that gets on the material leads to delamination;

- the nail is too cut. This is usually done with a very abrasive file in the transverse direction. Consequences: soreness of the nail, its thinning and stratification;
- antiseptics and degreasing agents were not used;
- excessive use of primerea, which leads to delamination;
- the nails are dry in the lamp. Nails will flake off if kept under the lamp for too long. The material will come off if it gets on the cuticle;
- all c-bends and arches were incorrectly adjusted and the apex (the highest point of the nail) was determined. Even slight thickening will cause detachment. It will change the correct lines of arches and C-bends. The thickening will cause the irrational distribution of the tension forces of the nail.
Extended nails require correction at least once every 4 weeks.
French
Gel nail extension at home can be done using different techniques.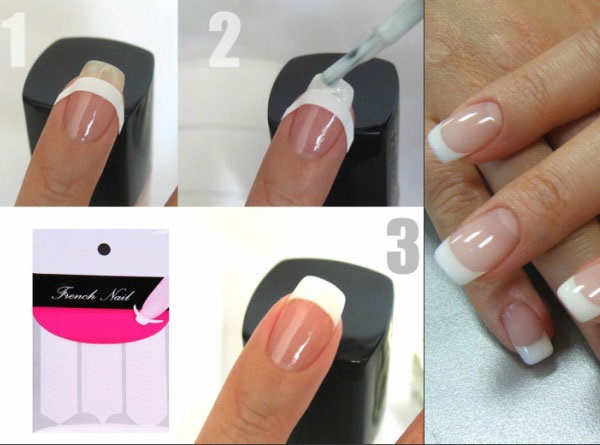
To create a French manicure, you will need to follow these steps:
- Determine the future length of the nail. Perform the extension procedure on tips or forms.
- Shape the nail with a file. It depends on what the smile line will be.
- Apply pink gel to the nail, dry under a UV lamp.
- Polish with a file.
- Draw a white stripe with modeling white gel on the free edge of the nail. It is necessary that the antennae be symmetrical, and the transition line is equally curved on all nails. File the edge of the nail.
- Sand the color transition.
- Apply a final layer of gel.
Solid nails: technique
To beautifully cover your nails with the same color, you need to fill your hand. Step by step instructions will help with this.
Stages:
- Disinfect your hands with a special product.
- Degrease your nails with a degreaser.
- Apply primer for better adhesion of the nail to the gel.
- Apply clear gel evenly to the nail.
- Dry your nails in a UV lamp for two minutes.
- Thoroughly paint over the nail plates with colored gel polish.
- Dry nails under ultraviolet light for 2 minutes.
- Apply another coat if a more intense color is desired.
- Dry the second layer for 3 minutes.
- Protect nails with a fixing agent.
- Remove the sticky layer using a special product.

It will take a beginner about half an hour to do this manicure.
Combined design
The combined design of nails includes various colors and textures:
- application of two or more shades;
- the use of murals, prints and stickers;
- a combination of different textures: matte and glossy, three-dimensional pattern, enamel.
Combined manicure ideas:
- Highlight 2 nails with lilac varnish, and paint the rest with burgundy.
- Paint 2 nail plates in a soft pink color, on which draw an ornament with black varnish and add rhinestones. Paint the rest in burgundy.
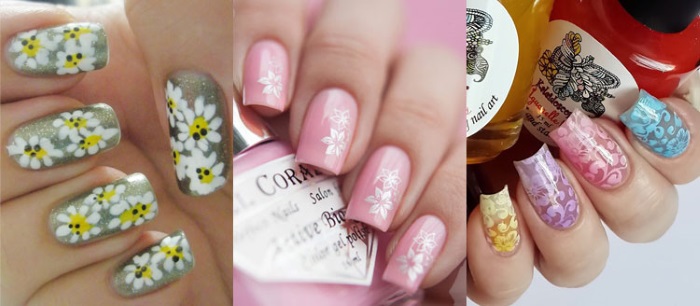
- On 2 nails, paint a floral print in white and pink. On other nails, draw a white and pink ombre.
- On 2 nails, draw a graphic drawing in the same color scheme, but with a different structure. Paint the rest of the nails pink.
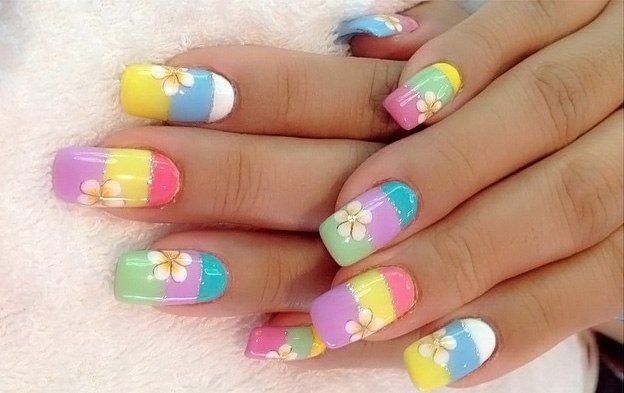
- Paint your nails with 3 colors of pastel shades: pinky - yellow, nameless - pink, medium - green, index - yellow, large - pink. In this case, select the hole and the outer edge of the nail plate with a thin white strip.
Art painting
Drawing is done with varnishes. To do this, use brushes, needles, toothpicks. It is possible to use rhinestones, sand, foil.
To create an abstract image on the nails, you will need:
- Follow the steps for nail extension discussed above.
- At the stage of nail design: apply a silhouette of a butterfly with a white gel, add a series of dots and draw several curved lines.
- Draw similar components on other nails. They should not repeat the pattern on the ring finger. On the little finger and thumb, draw only dots and wavy lines.
- Take the shade of the gel, which is close to the main background, and draw the leaves of the flower.
- Cover nails with fixative.
Designing flowers in an aquarium can be done by following these steps:
- Follow the steps for nail extension prior to design.

- Cover the nail plate up to the free edge with red gel.
- Apply the first tier of flowers with pink gel to the outer edge of the nail.
- Apply a transparent gel to the nails and place it under a UV lamp.
- Draw the upper tier of the petals with white gel, placing them between the petals of the lower tier. They need to be drawn in more relief.
- Apply transparent gel to nails and dry under a UV lamp.
- Remove the sticky layer and paint the stamens with white paint.
- Decorate the middle of the color with stones.
- Apply a finishing coat to the nails.
Manicure options
In 2018, the following ideas for nail design will be fashionable:
- deep dark shades are in vogue: Marsala color, wine, cherry, dark blue, brown, purple;
- fashionable combinations will be bright red, orange, pink and yellow;
- pastel colors are also popular: pink, blue, beige and others;
- graphic manicure and abstract drawings remain in trend;

- the combination of ombre technique and graphic design looks stylish;
- popular mini-landscapes on nails: greenery, floral motifs, etc .;
- for additional decor, you can use rhinestones, small shells, lace;
- a delicate shade with a correctly selected tone of powder and rhinestones looks harmonious;
- stylish manicure can be done using scotch tape and various shades of varnish;
- French and moon manicures are not losing their popularity.
 Don't miss the most popular column article: How to draw monograms on nails step by step for beginners. Instruction with photo.
Without using a UV lamp
There are two types of gels: sensitive and light insensitive. Sensitive ones are dried only under a UV lamp. Insensitive dry up under the influence of a special activating substance, which is applied in a thin layer over the surface of the entire nail plate. There are gels that harden in water. For this, hands are immersed in cool water for 5-7 minutes.
Professional cosmetics stores will allow you to purchase all the required materials for gel nail extension at home. Over time, the hand will become full and it will be easier to build up.
Article design: Vladimir the Great
Video on the topic: Gel nail extension
A quick way to extend nails with gel polish by yourself:
A detailed tutorial on building gel for beginners:
If you build on tips, then be sure to select only high-quality, proven glue. Once there was no glue, which I buy constantly, so I decided to buy glue from a new, previously unknown company, and here is the result: the nails began to fall off after a week (