The fashion for a natural look has led to a sharp decline in the popularity of artificial hair, false eyelashes, and unnaturally long acrylic nails. Least of all, this trend affected the procedure for building nails with gel on forms: a natural result with the help of step-by-step instructions and the availability of the necessary tools is obtained even by beginners in the manicure business.
Features of nail extension on forms
The modeling of the nail plate with gel nail extension is performed in two ways:
- with tips;
- using forms.
Nail tips are thin plates that stick to the tips of your own nails. In this case, the width of the contact zone must be minimized. The gel is applied to the surface thus elongated, creating a new nail shape. This easy extension is only suitable for girls with a standard nail arch.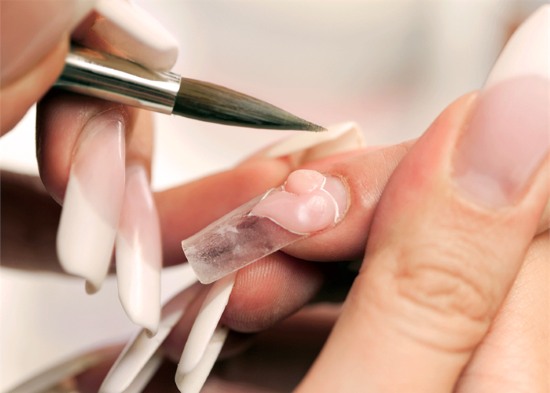
In addition, nail tips are fragile, short-lived and quickly lose their attractiveness when growing back.
When building up on forms, a template made of thick cardboard or plastic is taken as a basis, on which the gel is laid out. After polymerization, the template is removed and the resulting gel tip is shaped and shaped as desired.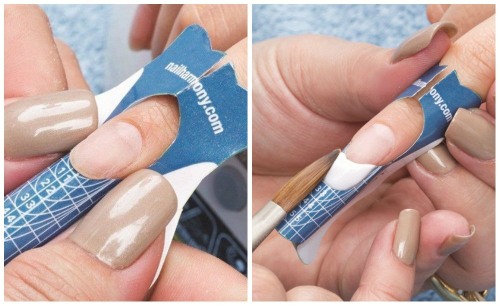
In comparison with tips, this method has a lot of advantages:
- does not require the use of glue that dries nails;
- suitable for girls with non-standard nail shapes;
- there are no restrictions on the length and the created shape;
- the result looks natural due to the absence of an extra layer of plastic inside;
- in the process of regrowth, the nails look aesthetically pleasing.
Types of gel for building
The gels used for extension differ in brands and components in the composition, as well as other important characteristics:
- by the method of polymerization: sensitive to UV rays and not photosensitive;
- by application technology: one-, two- and three-phase;
- by color: transparent, colored, camouflage;
- by appointment: gel-chewing gum, gel-jelly, stained glass.
Usually, it is difficult to choose a gel according to the application technology.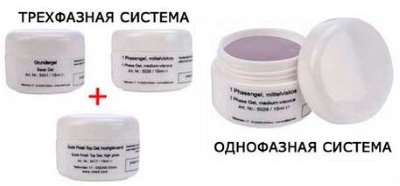
The building process consists of three major stages:
- training,
- modeling,
- fixing.
Accordingly, a single phase gel - the most versatile - is used in each of the three stages. With a two-phase gel, you can only do modeling and fixing, and you will have to buy additional coating for the base coat. Three-phase gel consists of three packs with different products for each stage of building.
Single-phase products are more liquid, easy to work with, they are most often chosen for strengthening nails or slight lengthening. However, the highest quality result: durability, minimal risk of detachment, hardness is achieved only with the help of three-phase technology. It is also the most difficult and requires a high level of skill.

 Don't miss the most popular column article: How to build up your nails with gel polish. Instructions for nail extension for beginners. A photo.
Required materials and tools
Building on forms takes place in three enlarged stages: preparation of your own nail plate, work with gel, design.
Tools for the initial stage can be found in the arsenal of any girl who is used to doing manicure on her own:
- disinfector for hands and instruments;
- file for natural nails (grit 240 grit);
- pusher, wire cutters, scissors, orange stick;
- dust brush.

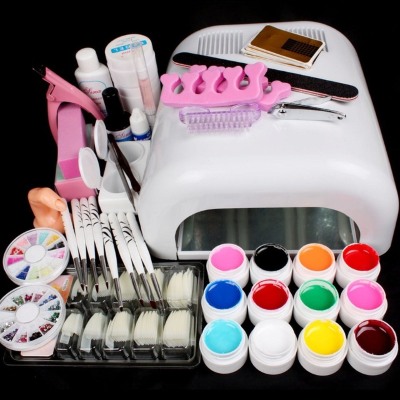
Materials and tools for working with gel must be purchased from a professional store:
- buff with coverage 120 grit;
- degreaser for nails;
- paper towels;
- cardboard or plastic forms;
- brushes for working with gel (artificial pile);
- primer (bond, ultrabond), base (if a two-phase gel is used);
- modeling gel;
- UV lamp with a power of 36 W (preferably with a timer);
- adhesive remover (or rubbing alcohol) and lint-free wipes;
- file for artificial nails (100 and 180 grit);
- top gel (top coat).
These materials are enough to create classic transparent gel nails with a varnish coating.
For design, French manicure, color coating, you will additionally need:
- gel camouflage;
- colored gels (especially white);
- acrylic paints;
- brushes for painting on nails;
- mica, foil, pigments, broths and other design elements.
Preparing nails
On the day of building, it is advisable not to use hand creams, do not make baths and masks, do not visit pools and saunas. When undergoing treatment with antibiotics, hormonal changes, fungal infections, damage to the cuticle, the build-up should be postponed until complete recovery.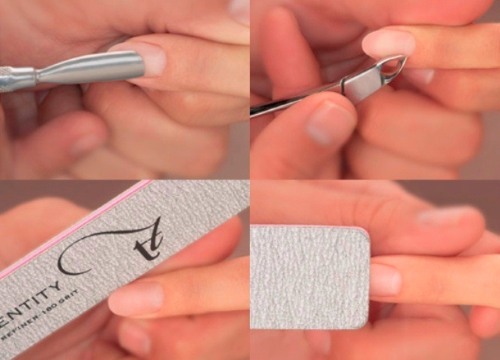
At the initial stage, manicure and preparation of the nail plate for laying out the gel are performed:
- Wash and dry your hands thoroughly, treat with an antiseptic gel.
- Treat the cuticle in the usual way, push it back with a stick or pusher. It is recommended to do a trim manicure no earlier than 3-4 days before the extension procedure.
- Cut off the entire free length of nails and file them into a pre-selected shape.
- Remove the glossy layer with a buff: with light movements that do not damage the nail plates, cut off the top layer of the nail, making it rough. Clean nails from dust with a small brush.
- Remove grease and moisture from nails using a degreaser.
- Prime the nails with a primer (bond), being careful not to get the composition on the skin of the fingers. After applying the primer, the nails should not be touched, as this will negate all the preparation work.
Extension technique in stages
Extension of nails with gel on forms, the step-by-step instructions for which are presented below, can occur using two technologies. They differ depending on which forms are used - top or bottom. The lower forms are fixed under the nail plate, lengthening it; the gel is laid out on top. Gel is first applied to the upper forms, and then the workpiece is pressed against the nail.
Working with bottom forms
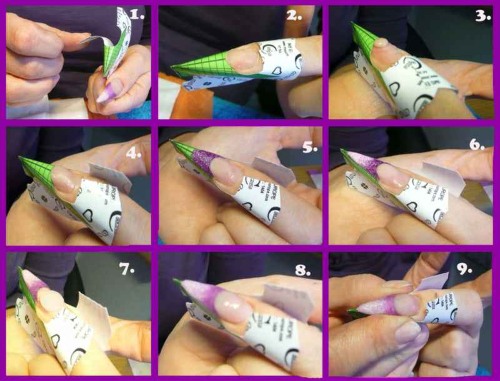
Step-by-step instructions for gel nail extension on lower forms:
- Prepare for building.
- Squeeze the template to an oval, and insert your finger into the resulting hole. In this case, the inner edge of the form should go slightly under the nail, being its continuation and coinciding with the smile line. Disposable forms made of foil and paper are given the necessary parameters by cutting off the excess with manicure scissors.

Extension of nails with gel on forms can be done independently if you follow the step-by-step instructions. - Spread the gel over the entire surface of the nail plate with a flat synthetic brush (for example, No. 6), starting from the base. When working with liquid types of gel (most often single-phase), turn your finger with your fingernail downward to evenly distribute the product. Dry in a UV lamp for 2-3 minutes according to the recommendations of the gel manufacturer.
- To form a natural bend of the nail plate, repeat step 2 again.This stage is all the more important, the longer the extended nail.
- Remove the sticky layer with degreaser or alcohol and lint-free wipes, gently pry off the mold and separate it from the finished nail. If the shape is removed poorly, then it is necessary to increase the exposure time in the lamp.
- Use a file for artificial nails to give the desired shape, adjust the length. Baf level the entire surface, filing and grinding it. Remove dust with a brush.
- Apply a finishing layer, dry, degrease.
Working with top forms
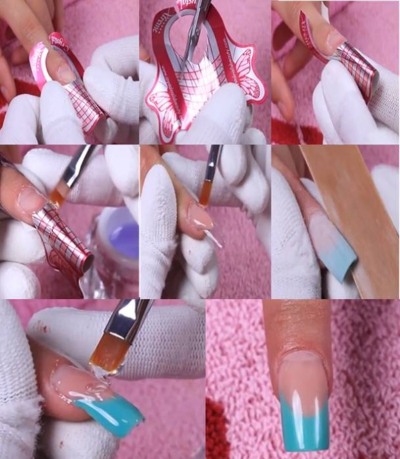
Step-by-step instructions for gel nail extension using the upper forms:
- Pick up the top forms for each nail. Place a couple of beads of gel in an inverted form and distribute them evenly with a synthetic brush. Dry in a lamp for 10-20 seconds.

- Repeat step 1, but dry for a few seconds longer the second time.
- Apply the gel at the base of the natural nail and, without polymerizing it, attach the upper form to the nail. Press down on the mold, squeezing out and removing excess gel. Dry for the time recommended by the gel manufacturer (usually 2-3 minutes).
- Remove the upper forms, remove the sticky layer from the inside of the resulting nails
- Saw off nails, shaping, apply top, dry, degrease.
What shape can you give your nail?
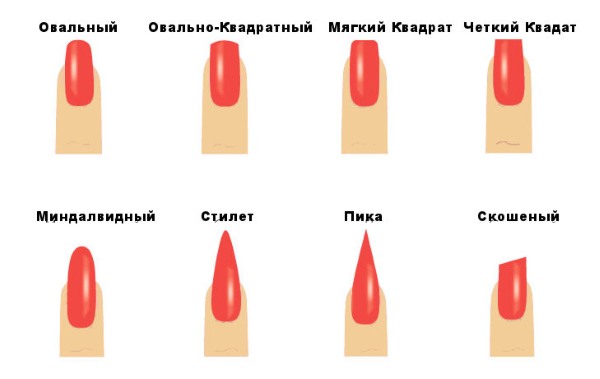
The shape of the nail is chosen based on the size of the hands and the length of the fingers, as well as the preferred style of clothing and lifestyle:
- square and oval-square ("soft square") are suitable for long fingers, graceful hands, appropriate in a modern and office style;
- oval and round - for large hands with short full fingers, will complement the calm classic and business style;
- almond-shaped - fragile hands with narrow fingers, as part of a romantic feminine or glamorous style;

- sharp (stylet, cat marigolds, spikes) - long fingers with a strong nail plate and extended nails, emphasize courage, love of risk and sexuality;
- "Ballerina" (sharp nails with a cut off tip) - any shape of hands and fingers, will decorate young lovers of novelties and fashion trends;
- beveled, beveled-twisted, fancy - they are more often represented at competitions of extension masters, in ordinary life they are chosen by creative persons who love to challenge society.
Gel nail care
Nails extended with gel on forms are quite strong and durable, unlike tips. With proper care, they retain their neat appearance for up to a month, do not chip, do not exfoliate and lengthen with the growth of their own nail plate.
Extended nails must be protected in everyday life:
- from exposure to detergents,
- long work in water,
- careless handling of kitchen utensils,
- from open fire.

Be careful when buttoning tight clothing, closing doors, and playing sports. For home care, it is better to use non-metallic tools, do not cut off the free length, but file it down. Use professional gentle varnishes and acetone-free removers.
Correction in a timely manner, not only for aesthetic purposes, but also for the preservation of their nails: the longer the nail, the more the stress zone is shifted, in which the plate is most often damaged.
How is gel nails corrected?
On average, after 3-4 weeks, natural nails grow back, and a noticeable border appears between the gel and its own plate in the area of the hole. Many people remove this difference in heights with a buff at home, but nail professionals do not recommend this technique: there is a risk of thinning your own nail and getting gel detachment.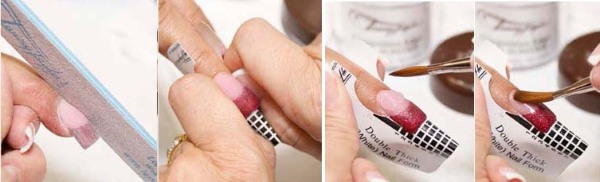
It is wiser to make a full correction every time the distance from the cuticle to the beginning of the gel is 3 mm or more. The indications are also damage to nails from blows, cracks, chips. The correction procedure consists of the same stages as the extension itself, but much more laborious.Therefore, the professionals in the salons often do not undertake to correct the work of other masters.
After disinfecting the hands and tools, the nails are prepared, the glossy layer is removed and the excess thickness is filed with a buff. After applying the base layer, the nails are modeled with gel. The forms in this case are previously extended nails, and the process itself resembles nail extension.
The polymerized material is sawed off, given shape and length. The final step is to apply a finishing coat and a cream that cares for the cuticle.
Don't miss the most popular column article: How to draw monograms on nails step by step for beginners. Instruction with photo.Professional advice
Scroll:
- Use materials purchased from professional stores.
- Carefully work with a natural nail without scratching or thinning it.
- Exactly follow the extension technology for specific materials.
- To study the recommendations of the manufacturer of cosmetics for application thickness, polymerization time and wear characteristics.
- Remember that too thick a layer of gel threatens to detach the artificial nail and damage the natural one.
- Do not gnaw, cut or pry on artificial nails with sharp objects.
- Rest the nail plate once every 3-4 months.
It is possible to build up nails with gel on forms using step-by-step instructions at home, but if you doubt the quality of the materials used or the accuracy of the technology used, it is better to visit a professional and "spy" the secrets of his work. It is wiser to do the initial build-up in the salon, and to cope with regular correction on your own.
Video: gel nail extension on forms. Step-by-step instruction
How to build nails on forms, find out in the video clip:
Step-by-step instructions on how to build up nails with gel polish:
When the master first proposed gel extensions, I doubted - for me all these artificial nails seemed terribly irrelevant. But as a result, I got neat shiny nails of natural length and color. Now I update them once a month, periodically adding interesting elements as an accent
I work as an accountant and all day I see only my hands on the keyboard and numbers. When my nails are out of order, my mood spoils, so I often do gel extensions and just file the length between procedures.
I build up my nails with gel on the upper forms according to the step-by-step instructions that I found on the Internet. At first I fiddled for a very long time, but from the third time the extension began to take me 40 minutes. And no salons!
When the master first proposed gel extensions, I doubted - for me all these artificial nails seemed terribly irrelevant. But as a result, I got neat shiny nails of natural length and color. Now I update them once a month, periodically adding interesting elements as an accent
Extension of nails on a form can be performed if the nail plates have a small free edge, under which special forms can be placed. This makes it possible to create an extension of the nail. To do this, you need to do quite a bit - contact a specialized manicure studio and use the nail extension service.
I love SPA treatments from the Alessandro International brand - it is an unforgettable pleasure. You will receive complete relaxation, aromatherapy effect and aesthetic pleasure.Alessandro products allow you to choose an individual care program, depending on the age, type and problems of the nails and skin of the client's hands.