Many girls are looking for ideas for manicure with gel polish every day. Photos on the Internet help to convey the client's desire to the master more accurately. But, before going to a manicure, many girls are worried about how safe it is.
Gel polish for manicure: pros and cons
Advantages of gel polish:
- Long coverage. With careful handling of nails, the gel polish can hold out intact for up to 3-4 weeks. Further, the nail plate grows back and the coating needs to be changed for aesthetic correction.
- Strengthens nails. Unlike other types of coating, gel polish does not weigh down the nail plate, which allows you to wear it for a long time without harm to nails.
- Ease of use. Having mastered the simple techniques of covering nails, you can easily do a manicure yourself at home, before purchasing the necessary tools.
- Fast drying. It will take no more than 7-10 seconds for each layer to fix and dry the gel polish using a special manicure lamp. This can significantly reduce the procedure time.
- Gel polish, unlike other types of coatings, is suitable for any form of nails. Therefore, it is not necessary to have long nails or to extend them to use a gel coat in a manicure.

Manicure ideas 2018 with gel polish (photo) are suitable for both short and long nails. - Reasonable price. Despite all the advantages, glaze varnish is affordable.
- Gel polish retains its beautiful shine during the entire period after application, which allows the manicure to look fresh and neat.
Minuses:
- It can take up to 30 minutes to remove the gel coat.
- Some nails in structure (depending on individual characteristics) may not be suitable for gel coating. The varnish will crack, peel off and not stick to nails.
- It is necessary to take a break of 7 days between the correction, so that the nails "rest" from this type of coating.
- If the nail plate is growing rapidly, the manicure will have to be renewed every 1-2 weeks, as it will look unaesthetic on the grown nails.
- When deciding to do a manicure yourself, you need to spend money on equipment and tools for coating with gel polish at home.
- Dries out the nail plate. Before applying gel polish, the master always degreases the nail with a special tool. This can lead to overdrying of the nail plate.
There are many benefits to a gel coat. With the right approach to manicure, you can avoid possible troubles and get beautiful, shiny, neat nails for a long time.
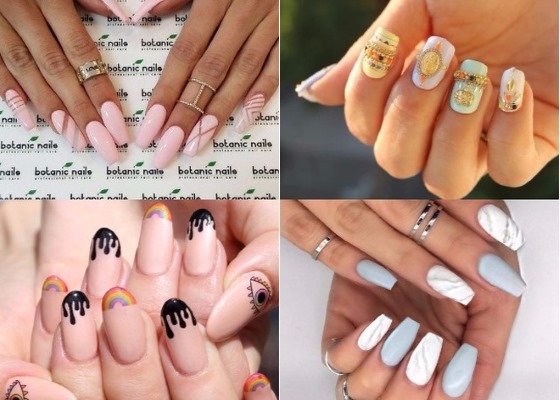
Fashion trends in 2018 in nail design
Gel polish manicure ideas (photos can be viewed later in the article) are updated almost every season.

 Don't miss the most popular column article: How to draw monograms on nails step by step for beginners. Instruction with photo.
2018 nail trends:
- Stickers. Special manicure stickers can be purchased at dedicated manicure supply outlets. Stickers remain popular because they are easy to apply yourself.
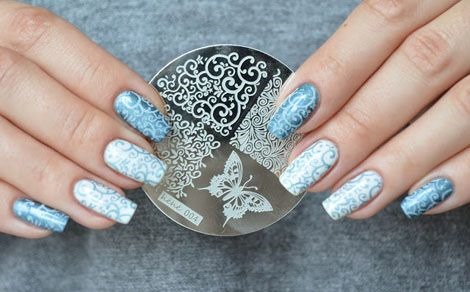
- Stamping. It is better to entrust this technique to the masters. With the help of stamping, you can make a beautiful manicure with stamps and patterns. Additional tools and accuracy are required to complete.

- Divorces of different colors. A bold new season trend is the use of multiple complementary colors to create beautiful colored nail designs. The main thing is to choose the right colors so that they combine with each other and harmonize.
- Geometry, lines, patterns. All kinds of geometric shapes, curls and patterns are popular this year. They can be created on both transparent nail coat and color. The main thing is not to burden a bright manicure with a complex pattern and observe the measure in saturation with details.
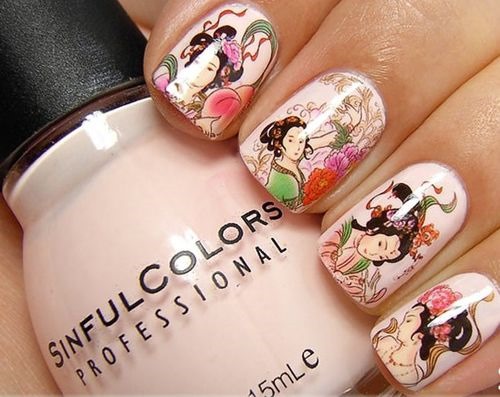
- The use of colors in the coating. The floral theme does not lose its relevance this year. These can be varnish flowers, dried flowers mixed with coating, tiny flower decorations, and many other ways to create a flower glade on your nails.
- Individual decorative elements remain popular: rhinestones, stones, microscopic decorative designs that are attached to the nail. With the help of such a decor, you can create a unique design that has no analogues. The main thing is not to overdo it with the number of decorative elements.
- Sculptural modeling in manicure. With this technique, the nail artist can create a real piece of art on the nail. It can be an embossed flower, an object, or even a mini-picture. It all depends on the level of the master's technique and the client's wishes. The modeling looks impressive on the nails.
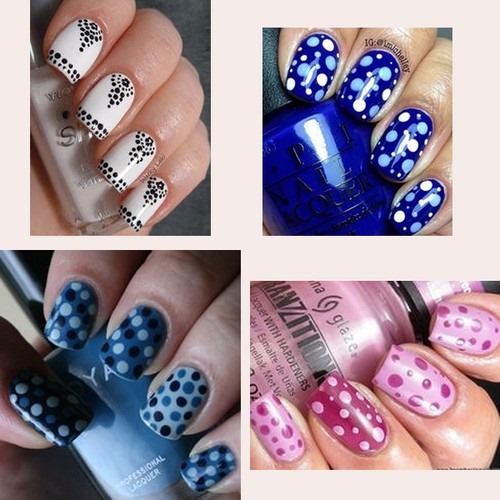
- Create a dot pattern. This technique has gained popularity due to its showiness. Amazingly beautiful mandalas and other drawings of a similar theme are obtained in the process of applying varnish with dots. The dot pattern adds up to one picture that conveys the mood of the entire manicure.

- Themed manicure also remains popular. Summer designs or stickers of juicy fruits, berries, palms are gaining popularity due to the opening of beach holidays and travel. In the fall, drawings and designs of autumn leaves, umbrellas and other autumn paraphernalia will be popular.
Ideas for styling short and long nails
Gel polish manicure ideas (photo designs can be seen below) are suitable for different types of nails.
Design ideas for short nails:
- basic, discreet, monochromatic coating. Suitable for lovers of minimalism and laconicism or those whose working style requires a discreet manicure;
- thermo varnish. Varnish that changes color depending on the ambient temperature will look great on short nails;
- stickers. Miniature, small stickers will not spoil the manicure on short nails. On the contrary, they will add playfulness to the image;

- small decorative elements. Large, massive designs of rhinestones and sequins will weigh down and visually shorten an already short nail. And small decorations, correctly placed on the plate, will make the manicure complete.
These manicure designs will look appropriate and laconic on short nails.
Ideas for decorating long nails:
- all types of designs and finishes are suitable for long nails. Since the surface for the work of the master is larger, complex techniques and the presence of massive decorative elements, complex techniques of modeling and painting will be appropriate;
- complex, multi-colored manicure;
- all types of sculpting, point manicure;
- massive structures from decorative elements;
- marshmallow manicure;
- manicure using techniques that make it possible to make a coating similar to marble, "cat's eye", glass, metal.
 Almost any finish and design can be applied to both long and short nails.Due to the obvious advantage, the large length of the plates can look harmoniously with a complex coating, several techniques and many decorative elements.
Technique for performing French manicure
French manicure has remained relevant for 15 years.
Technique for performing French manicure:
- If the manicure is done by a master, you can do it without special stickers. If you have insufficient experience at home, it is better to use special stickers that will allow you to make even, neat stripes.
- Treatment of nails with a special file, which will make the nail plate smooth and soft.
- Cuticle treatment to avoid messy coverage.
- Degreasing nails with a special tool.

- Base coat application, which is dried in a special lamp for 1-3 minutes.
- Applying a white stripe with a brush or special stripes. Drying.
- Coating with a fixing agent. Drying in a lamp.
- Cuticle oil, do not wash your hands for 45-70 minutes after the procedure.
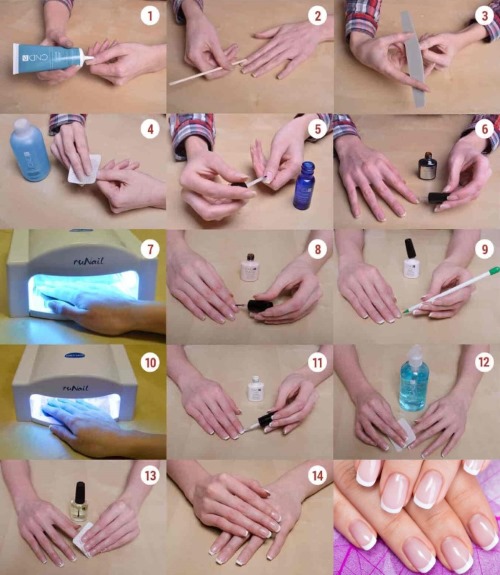
The subtlety of performing French manicure lies in accuracy. For perfectly even white stripes, it is best to use special stickers.
Shellac
The shellac coating technique is not difficult.
Stages of performing a manicure with shellac:
- Nail treatment, shaping.
- Cuticle treatment.
- A special brush for removing dust after filing nails.
- Treatment with a disinfectant.
- Degreasing treatment.

- Base coat application.
- Dry in a lamp for 30 to 60 seconds.
- Colored varnish application. Drying in a lamp. Dry nails in a lamp for 60 to 90 seconds after each layer.
- Securing coating with a special agent. Drying in a lamp.
- Cuticle treatment with oil.
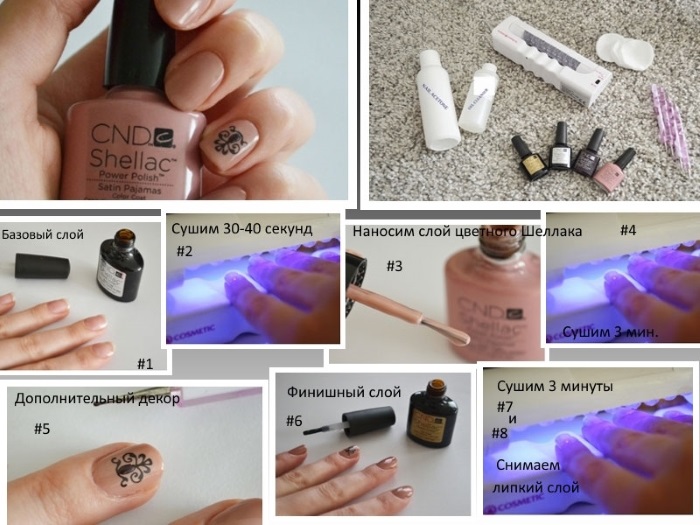
The subtlety of this technique lies in the strict adherence to all stages.
It is necessary to thoroughly dry each layer of varnish or base.
Then the coating will be smooth, shiny and durable.
Manicure with rhinestones
Technique for performing manicure with rhinestones:
- Nail, cuticle treatment.
- Dust removal, degreasing.
- Base application, then coating with stage-by-stage lamp drying.
- With the help of glue, make a pattern of the pattern (if it is a complex decor) on a note.

- Using a needle or a toothpick, pry off the rhinestone and put on the glue previously applied to the nail.
- After fixing all the decor elements, apply a fixing coating so that the rhinestones are firmly adhered to the nails.
- Dry in a lamp.
- Treat the cuticle with oil.
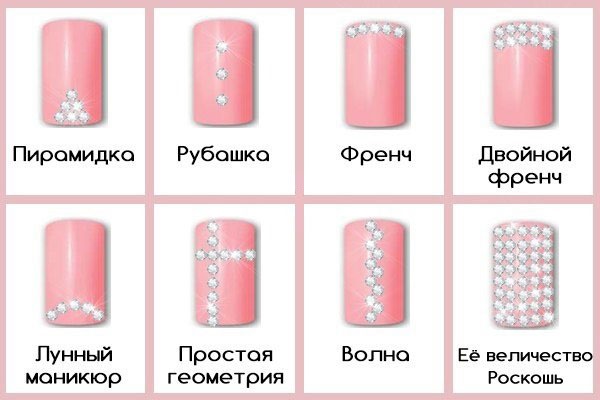
A manicure with rhinestones does not differ from the standard color varnish coating. The only subtlety is all decorative elements are best applied last, before the fixing coating... Otherwise, they may lose their gloss and transparency.
Rubbing technique
Gel polish manicure ideas, photos of which are presented in the article, are inexhaustible. One of them is rubbing. For the last few seasons, this type of coating has been in great demand.
Rubbing technique:
- Standard procedures for nail preparation: processing, grinding, working with cuticles, degreasing.
- Maximum polishing of the nail plate. The result of this technique depends on this.
- Base coat application, curing in a lamp.
- Coating with gel polish, drying in a lamp.
- Take a small amount of rubbing on the brush and distribute it evenly on the nail, leaving no empty spaces.
- Remove the rest of the rub, cover the nails with 1-2 layers of a fixing coating. Remember to dry your nails after each coat.
Feature: for a better mirror effect and shine, it is recommended to rub in again.
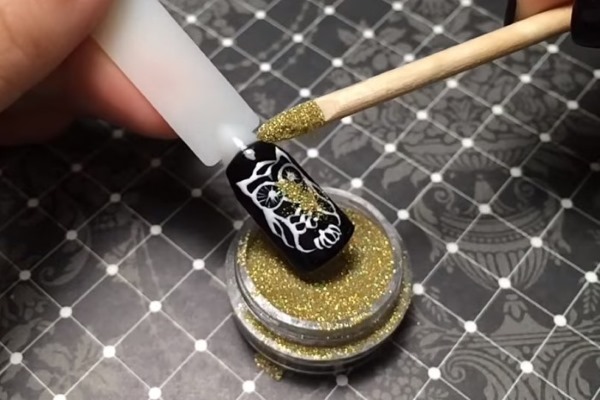
Glitter manicure
Technique for performing a glitter manicure:
- Procedures for preparing nails for manicure: treatment, cuticle treatment, sanding, degreasing.
- Coating with a base or colored varnish, depending on your desire. Drying in a lamp.
- Further, the process takes place depending on the type of decoration with glitters: line, pattern, geometric shape.
- Apply special glue to the desired lines.
- Apply glitter to the entire nail with a brush or sprinkle over the entire surface.
- Remove excess glitter.
- Apply a fixing coating, dry.
- The sequins are finished.
Subtleties of the process:
- think over the design in advance;
- quickly apply glitter until the glue is dry;
- observe all stages of the application technique.
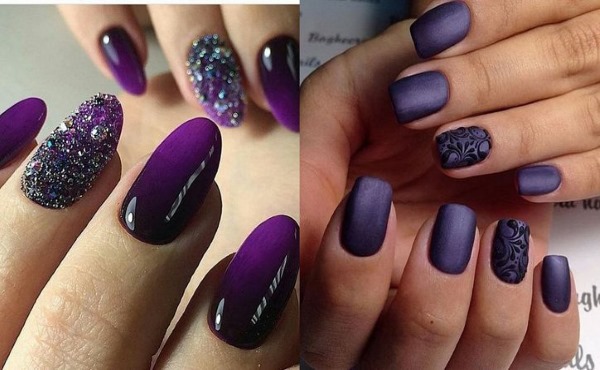
Don't miss the most popular column article: How to build up your nails with gel polish. Instructions for nail extension for beginners. A photo.Solid red and black nails
Gel polish manicure ideas (photos help you choose the right design) often lead to the desire to make the coating monochromatic.
This is a safe bet that will look perfect on nails of any length and shape.
The technique for performing a monochromatic nail coating is simple:
- Preparation of nails for coating: shaping, sanding, cuticle treatment, degreasing.
- Base coat application. Drying in a lamp.
- Color coating, red or black, curing in a lamp.
- If necessary, apply 1-2 additional coats of color for best results. Dry in a lamp.
- Applying a fixing coating. Dry in a lamp.
The peculiarity lies in the observance of all stages of the manicure. It is especially important to treat the nails with a degreasing agent so that the coating lies flat and lasts a long time.
Moon manicure
Technique for performing moon manicure:
- Preparation of nails for coating: processing, sanding, degreasing.
- An important point: to process the cuticle as much as possible, removing all unnecessary. The quality of the moon manicure directly depends on this.
- Basic coverage. Dry completely.
- Cover the nails completely with the selected color. This will be the color of the coating of the nail holes.
- Apply special stencils to the holes of the nails and cover the nails with the color chosen for the base. Dry. Remove the stencil.
- Secure the result with a special coating.
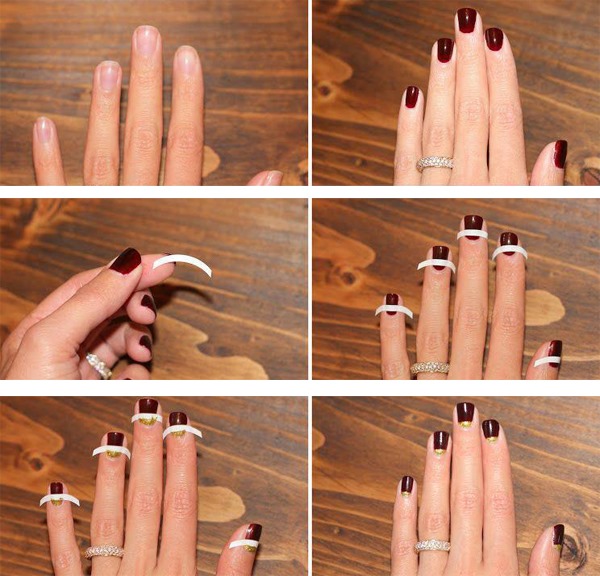 A feature of the process is the use of stencils for closing the nail holes.
Point manicure
Technique for performing a spot manicure:
- Preparation of nails for drawing and coating: shaping, sanding, cuticle treatment, degreasing.
- Choose a drawing and decide on the degree of complexity and color scheme.
- Base coat application. Drying.
- Drawing with a special tool - dots.
- Fixing with a special coating. Drying in a lamp.
- Spot manicure is ready. Over time, more and more complex patterns and designs can be made.
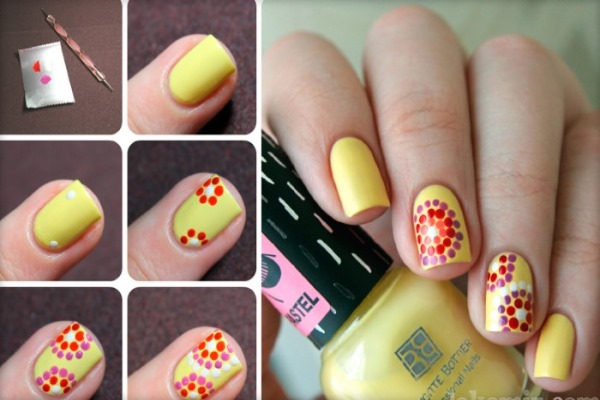
The peculiarity of this type of manicure lies in the correct color scheme and in the accuracy of working with dots.
Technique "ombre"
Technique for performing ombre manicure:
- Preparation of nails for coating: sanding, shaping, cuticle treatment, degreasing.
- Base coat application. Drying in a lamp.
- Application of the first color coat. Drying in a lamp. Apply an additional coat of varnish if necessary.
- Arrange additional colors on a separate surface in the desired order. For a more beautiful effect, you can blend the borders of the varnishes with a toothpick or needle.
- Dip the sponge into the resulting color palette and apply to the nail.
- Without waiting for the ombre to dry, apply a fixing coating. Dry.
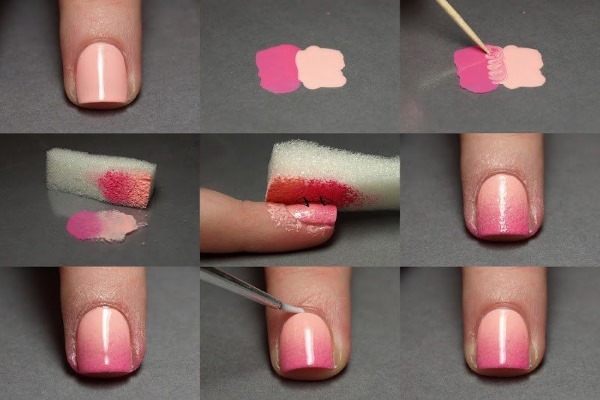 If inexperienced, the result may be blurry or uneven at first. Gradually, the skills of creating a manicure will be honed. Then you can use complex color combinations, but the design will be neat and beautiful.
Veil technique
Performing the veil technique on the nails:
- Prepare nails for coating as in the previous techniques.
- Place the substrate on the nail plate. Dry in a lamp. Drying time depends on the type of lamp and varies from 20 seconds to 1.5 minutes.
- Application of a previously prepared drawing: a pattern of dots, lace, curls.
- Drying in a lamp.
- Securing coating. Drying.
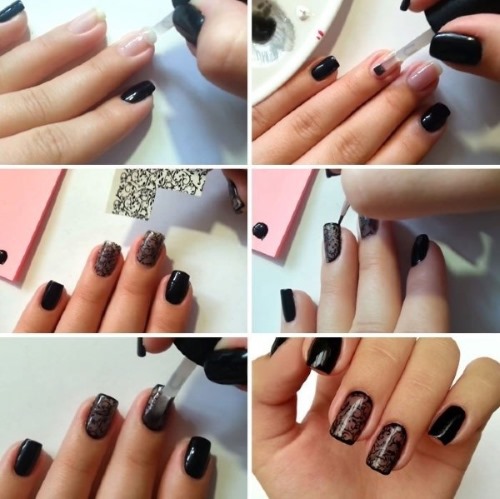 The veil technique, despite its beauty and seeming complexity, is simple. The main thing is not to start with complex drawings and patterns.
Manicure using ribbons
Manicure using tapes:
- Preparing nails for coating.
- Basic coverage. Drying.
- When the coating is completely dry, place the tape in the desired order and place on the nail.

- During application, it is advisable to stretch the tape slightly so that it lies flat and beautifully.
- Apply a fixing coat.
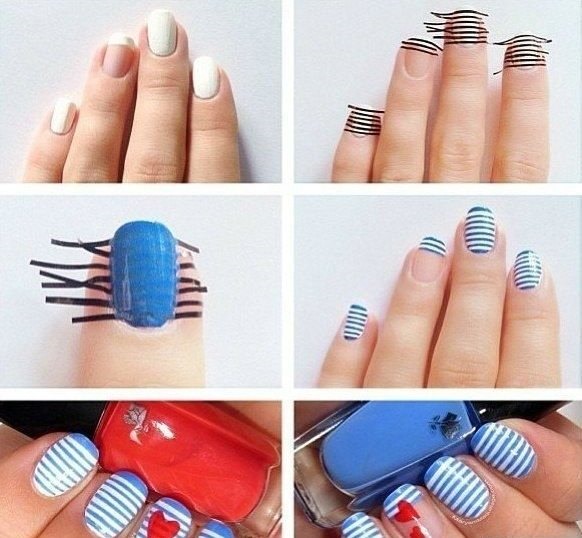
Once you get used to using ribbons in simple nail designs, you can try complex patterns and combinations of different colors.
Manicure with painting and decor elements
Execution technique:
- Preparing nails for coating.
- Basic coverage. Drying.
- Application of a colored coating layer. Drying.
- If this is a painting, at this stage painting of nails begins. With the help of special tools (brush or needle) simple or complex drawings, even whole miniature paintings, are made.
- Decor elements, regardless of their size, are attached with glue at this stage too.
- Anchoring layer.
Such a manicure is not difficult.
Ideas for wedding manicure
Gel polish manicure ideas (photos of a wedding manicure are presented below) are in great demand:
- Classic. Pastel shades, minimum decor, monochromatic finish.
- French manicure. It can be either classic (with an appropriate wedding style) or color (if the wedding involves a departure from the classics).
- Bright, monochromatic manicure. It is popular with brides, whose wedding theme implies the presence of a certain color scheme for the decoration of the celebration.
- Minimalistic decor elements. Miniature rhinestones on one finger or small decorative designs will look appropriate with a classic, solid color.
- Painting... A sophisticated type of manicure when one or more nails are carefully painted with white varnish. It can be a beautiful pattern, a silhouette of a bride, or a floral design.
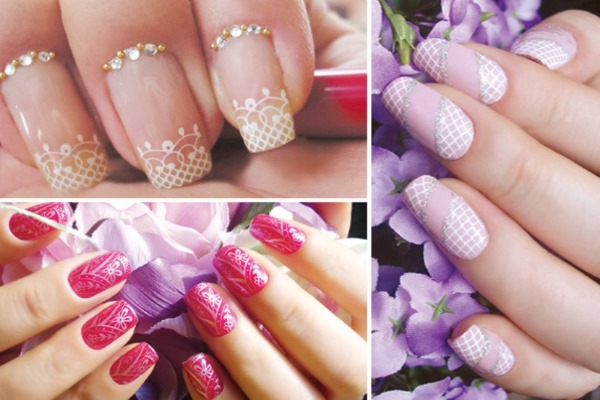
Almost any technique in manicure can be applied to a bridal style. It all depends on the level of professionalism of the master and the desire of the bride.
Professional tips for creating manicure and nail care
Gel polish manicure ideas, the main ones of which can be seen in the photo, never run out. New techniques and techniques are constantly emerging that allow you to create something incredible on your nails. But it is important to give your nails a break from any kind of coating.
Tips from professionals and manicurists:
- Always remove the coating before applying a new one, without using a liquid containing acetone. It damages and destroys nails.
- Rest your nails after 1-2 months of regular manicure.
- Take care of the cuticles using special products. Then it will be soft and pliable to processing.
- When applying the coating, pay special attention to the ends of the nails, painting over every millimeter. Then the coating will last longer and will not chip.
- Always degrease the nail plate before applying the coating.
- It is better to apply varnish in several layers for the best result.
- Take care of your hands regularly.
- Do not use the nail file at a lateral angle. This threatens to brittle nails in the future.
- Do not skimp on varnish by using only high-quality coatings.
Using the advice of the masters, you can perform a manicure with gel polish or using another technique at home. You can see photos of designs to choose a suitable one, or to embody your own idea. The main thing is to use high-quality varnish and regularly update the manicure in order to preserve its aesthetics.
Article design: Oksana Grivina
Video about gel polish manicure
Amazing ideas:
https://www.youtube.com/watch?v=fmhjvlmkorY
Awesome, stylish manicure ideas. Some of them can be implemented on your own.