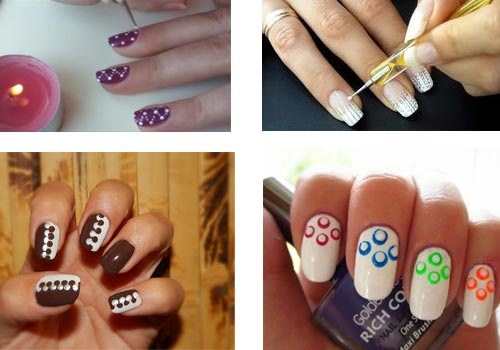
Dotter patterns are the easiest way to diversify your everyday solid color. Most often they are painted with dot, geometric, floral or lace ornaments. Dots for nail design are used not only in salons, but also for self-creation of a manicure.
What is dots
Dots for nail design (how to use, described below), or a dotter is a tool for creating drawings on nails. It looks like a pen with a small metal ball at the end.
Most often, dots are made double-sided, with two balls of different diameters at different ends.
What is it needed for
Dots was originally created to do polka-dot manicure. This is evident from the name. After all, "dot" in translation from English means "point". In addition to points, it is convenient for them to draw straight and curved lines, draw outlines and paint over the space inside them.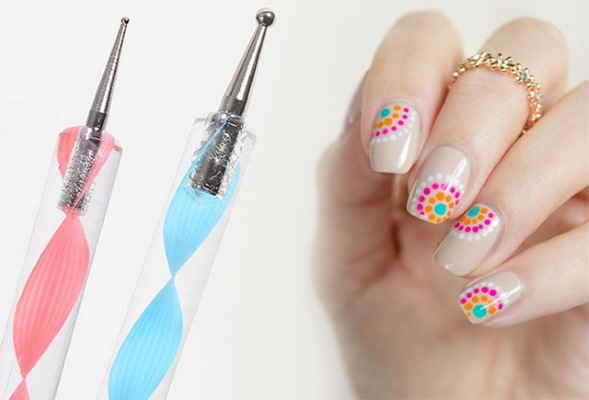
Dots are easy to use for military or leopard nail designs. With due dexterity, they draw openwork lace and other complex patterns on the nails.
Varieties of tools
The only essential characteristic of a dots is the diameter of the ball-tip. The size of the picture depends on it.
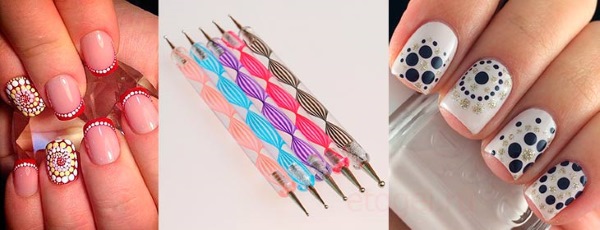
All dotters are divided into three groups:
- With a small ball. It will allow you to depict thin lines, draw an outline or put a small point.
- With a medium ball. It serves to draw various details of the picture: the middle of flowers, curls, medium-sized dots.
- With a big ball. This tool is useful for filling a path with color or for drawing a large pea.
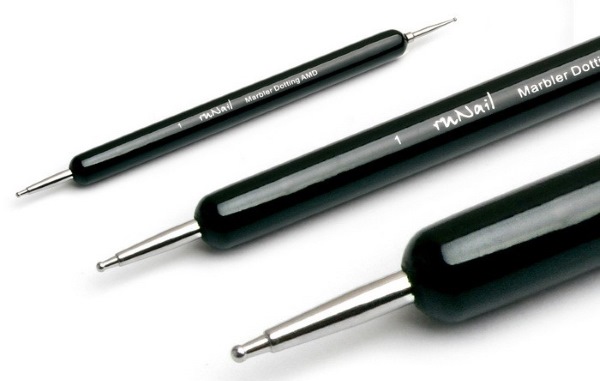
It's better for a beginner to start with two dotters: large and medium. Most often, dots are made double-sided. Therefore, it will be enough to purchase only one tool, choosing the most suitable tip diameters.
Best rating
Dotter is a very simple tool. Therefore, the brand does not play any role. A tool ordered through a well-known Chinese resource will work the same as purchased from a nail art store.
Below is the rating of seven reliable sellers of dots on a well-known procurement resource:
- Shop3187002 Store.
- Makeup Store.
- Stylish Bueaty Store.
- MintSun.
- Beautifully Store.
- Born Pretty Co., Ltd.
- BeautyLadyNailArt Store.
 For those who are just starting to paint on nails, one double-sided dots with balls of different sizes will be enough. Those who want to achieve perfection in nail art will need a set of several tools.
Typically, a set includes 5 dotters with different tips, from the smallest to the largest. A variety of sizes will allow you to bring to life the most intricate patterns.

 Don't miss the most popular column article: How to draw monograms on nails step by step for beginners. Instruction with photo.
How to use dots: step by step instructions
Dots for nail design (how to use to make a spectacular drawing, explains step-by-step instructions) is applicable at home:
- To draw a point, you need to carefully type varnish on a metal ball and press it against the nail plate.


- To draw a line, you need to draw the dots in the right direction along the nail.The varnish should be collected carefully so that the excess does not form blots. Better to start with straight lines. After a few experiments, you can move on to waves, zigzags, steps. At the end, the line always fades out, since there is less varnish on the ball. The slower the dots moves, the less attenuation is expressed. With a leisurely drawing, paint is consumed more evenly.
- It is most convenient to fill the space inside the contour with strokes, drawing parallel lines located close to each other. This will create an even and uniform texture.
- While painting, you should regularly wipe the tip with a soft cloth or cotton pad to remove particles of drying varnish.

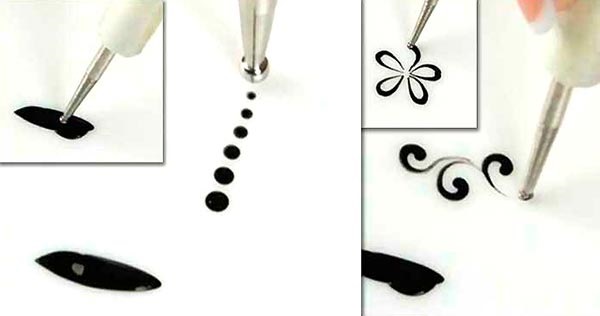
Dots drawing is similar to drawing with an ordinary pen. You just need to monitor the amount of varnish on the ball. If there is not enough of it, the pattern will not be visible. Excess can lead to ugly blots.
The thickness of the lines and the size of the points depend on the diameter of the ball. For a beautiful manicure, dots of at least two sizes are required.
It is convenient for small ones to draw lines and small dots, and for large ones it is convenient to make large peas and fill large areas inside the contour.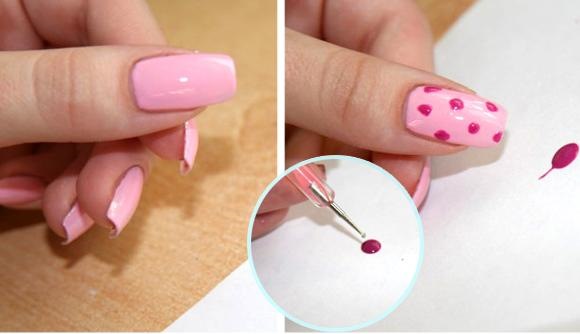
It is inconvenient to dip dots into a bottle of varnish. It is so difficult to adjust the amount of varnish collected. In addition, there is a great risk of staining the handle, and then all the objects lying nearby. It is more convenient to use a palette. You can make it yourself from a piece of paper or a piece of foil, or buy it at a stationery store.
When drawing dots, one should not forget about the following rules:
- before starting a manicure, you must definitely apply the base;
- if the plans do not include mixing colors, each layer should dry well;
- when the drawing is finished, be sure to cover it with a top.
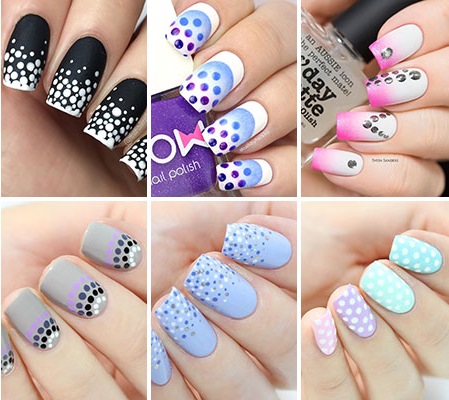
With the help of dots, you can make a dot pattern - an analogue of an ombre.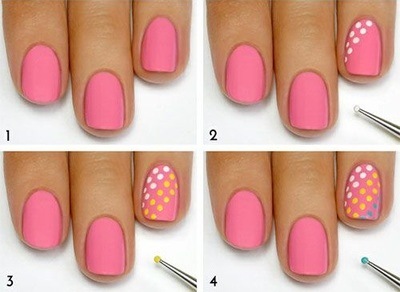

You just need to put peas in a row, gradually changing the tone of the varnish from light to dark or vice versa. The easiest way to do this is to dilute the selected shade with white varnish.
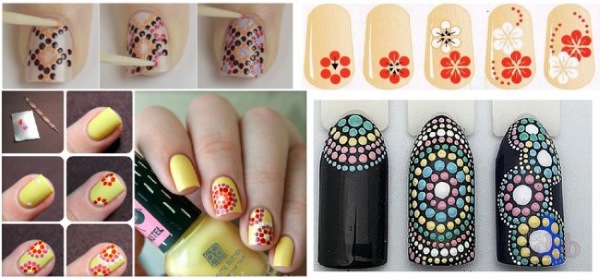
How to draw simple dot patterns with dots
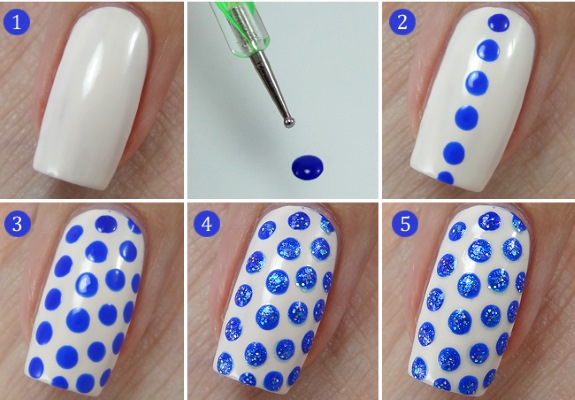
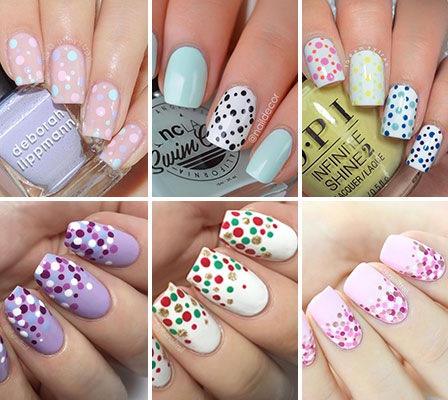
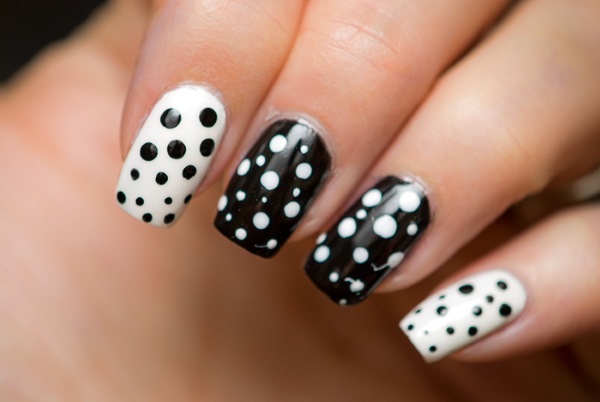
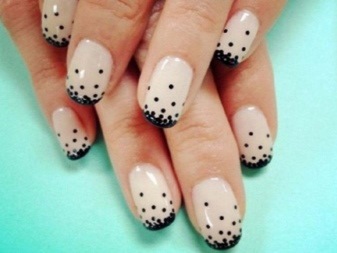
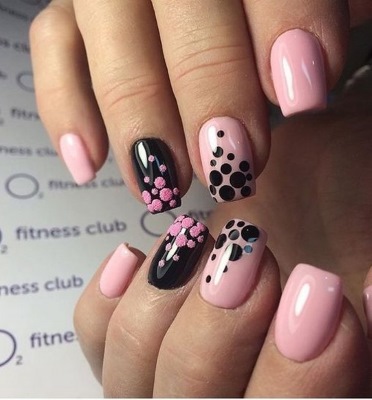
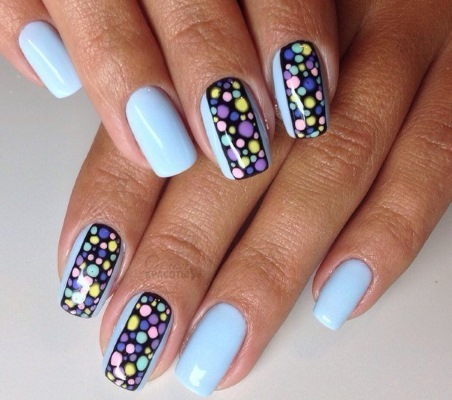
The simplest pattern that can be made using dots is dots or polka dots. This will require at least two shades of varnish: for the base coat and for the drawing. The dots can be made multi-colored, but it is undesirable for beginners to use more than 3-4 colors. It will be very difficult to draw the polka dots nicely and neatly.
Colors can be:
- Contrasting. The safest option is white with any trendy shade.
- In one color scheme. Then one varnish should be pastel and the other bright. For example, pastel and bright yellow, powdery pink and fuchsia, sky blue and blue, peach and bright orange.
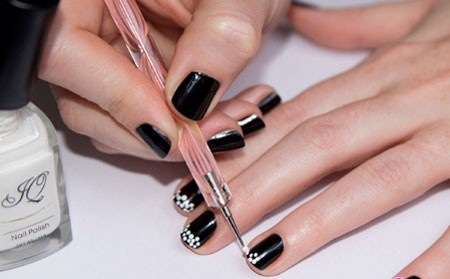
Dots for nail design (how to use to create a point manicure is described in detail below) is suitable for creating any image:
- Treat the nails: move the cuticle, shape, polish.
- Apply base coat in one coat, let dry.
- Apply base varnish in one or two coats. Dry each layer well.
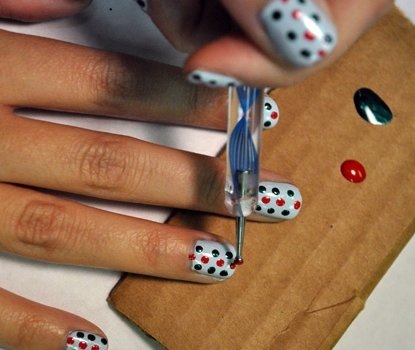
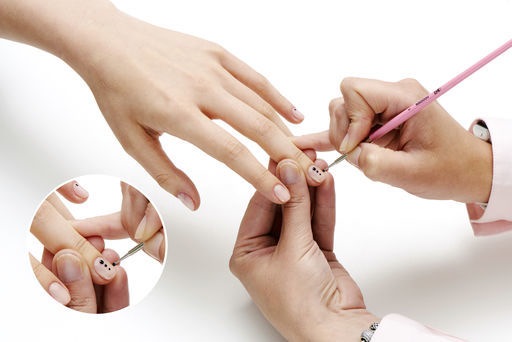
- Put a drop of varnish on the palette to paint dots. Dip the tip of the dots into the varnish and gently press it against the nail. Repeat for each planned pea.
- Let the drawing dry.
- Top with topcoat.

The points can be of the same or different sizes. For identical peas, you need to collect varnish every time. If you draw several elements in a row, each subsequent point will be slightly smaller than the previous one. It is so convenient to draw a “fading” row. And the easiest way to vary the size of the peas is to take dots of different sizes.
Other dot patterns
Pattern options:
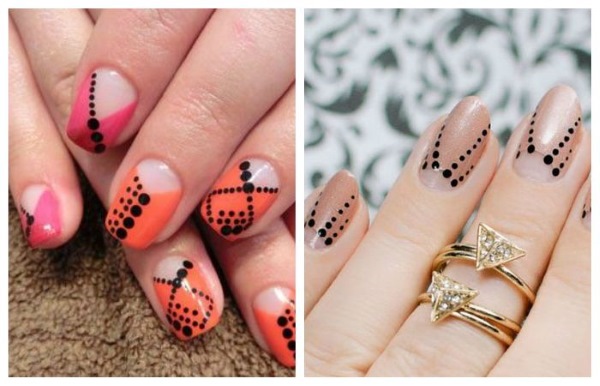
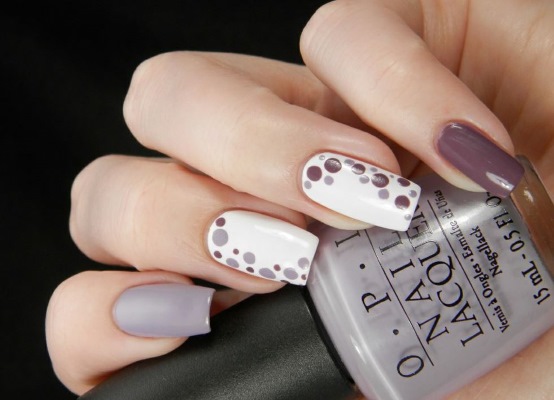
- "Lines". Line up points in a line. They can be longitudinal (along the nail plate), transverse, or diagonally.

- "Star". Make "rays" outgoing from one point.
- "Speckled". Randomly draw peas of the same or different sizes.In this pattern, you need to try so that the points are approximately at the same distance from each other.
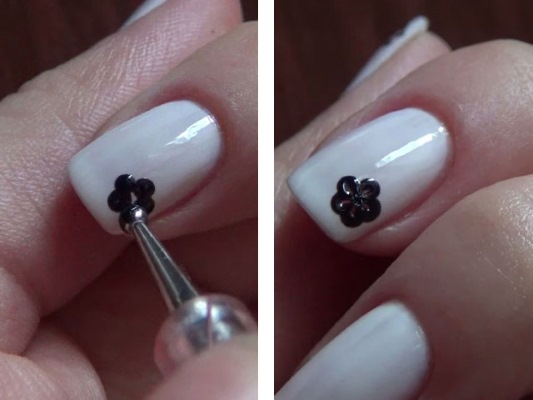
- "Flower". Arrange the dots in the form of a flower: one in the middle and 5-6 around it.
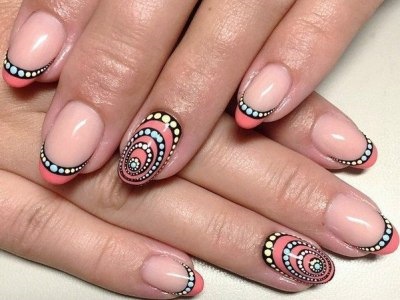
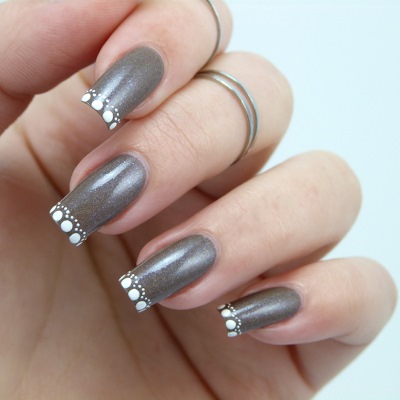
- "French manicure". Draw a line of peas parallel to the hole or edge of the nail. This variation of the jacket will be discussed in detail below.
- "Inversion". The highlight of this manicure is the replacement of the main varnish on one or two fingers. For example, if a pattern is supposed to be in blue and white, then three fingers of the hand will have blue dots on a white background, and on the other two, on the contrary, white on blue.
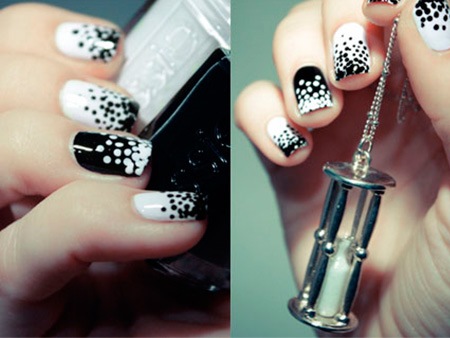
- "Confetti". It is a pattern of dots of different colors and sizes, partially overlapping each other.

Success will depend entirely on choosing the right pattern. Start with simple ornaments. For example, with one longitudinal line of dots, stars or a "speckled" manicure. Having gained experience, it will be possible to make a more complex painting.
Confetti
Dots can draw an original pattern that resembles multi-colored confetti. It will require a base varnish and several varnishes in matching colors for the bright spots.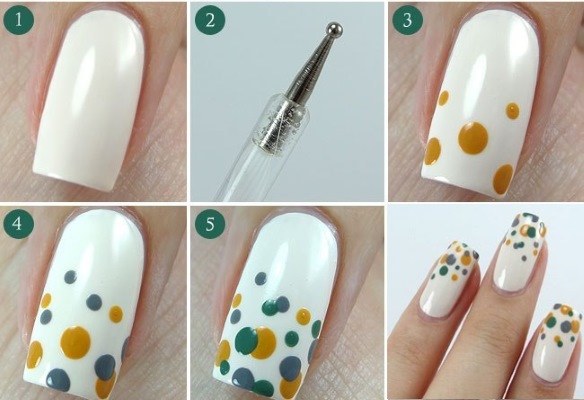
Sequencing:
- Treat, shape and polish nails. Apply a base coat and dry.
- Apply 1 or 2 coats of base varnish. Dry well.
- Apply a drop of decorative varnish to the palette. The first is to take the color for the points that will overlap the rest.
- Gently pick up the varnish on the dots and draw the dots of the desired size. Dry the layer.
- Apply a different color to the palette. Dot them and dry them. The points of the second layer should be slightly smaller than the previous one, and there should be a little less of them. The first layer should be clearly visible.
- Repeat until all lacquer colors have been used. For the first manicure, 2-3 colors will be enough to understand the principle of placing the peas. Then, with experience, you can expand the palette and create incredible patterns.
- Dry all layers well and top with top.
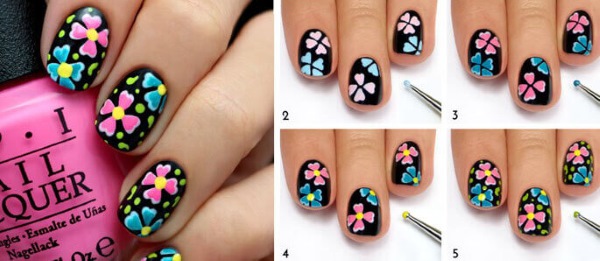
Flowers
Dots for nail art (how to use to draw a flower, described below) can be used in drawing summer patterns.
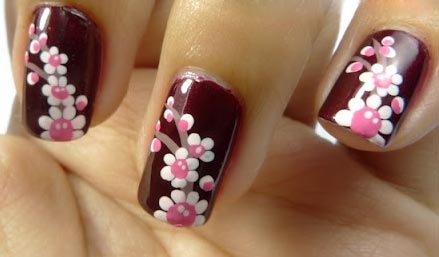
Technique for performing the simplest option:
- put a large or medium-sized point on the nail plate - the middle;
- put 5 or 6 petal points around it.
The petals can be the same size as the middle, or slightly larger. If you wish, you can stretch them by stretching the varnish from the center to the edge. This is done with a small dots or a toothpick. In this technique, you can draw lilies, chamomiles, or leaves to decorate the composition.
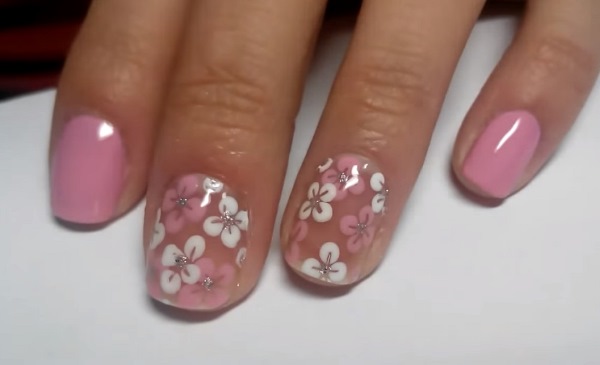
The second option is a little more complicated. Suitable for those who have already mastered the initial drawing technique:
- put 5 petal points so that they slightly overlap each other;
- let dry;
- draw middle points in a contrasting color;
- to make the flowers look natural, draw curls - the stems.
 The third way is for those who have been drawing with dots on nails for a long time and have mastered simple patterns perfectly:
- dial black or any other dark varnish on a small diameter dotter, with which the outline will be drawn;
- draw a circle - the middle;
- draw petals with curved lines;
- let the contour dry;
- take medium or large dots and varnishes for painting;
- evenly fill the space inside the contours with the desired colors;
- cover with top.
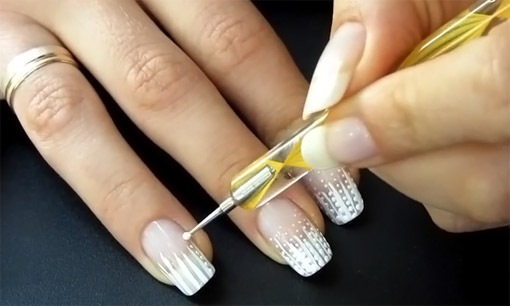
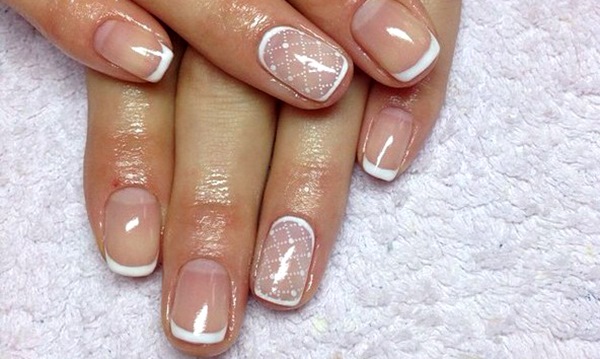
French manicure
It is very easy to make a jacket with dots. It's even easier than using the classic manicure strips method. Two options will be described step by step below.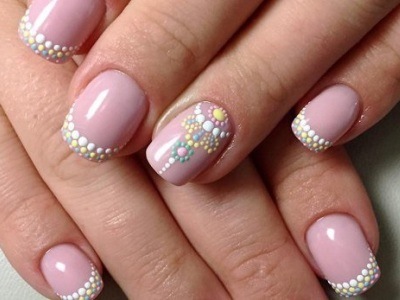

Option one - a smile from dots:
- Cover the nail with base varnish in 1 or 2 layers, let dry.
- Dial white varnish on an average dots and put the dots in a line that exactly repeats the bend of the edge of the nail plate. The smile should recede from the edge of the nail at a distance approximately equal to the diameter of the point.
- Allow to dry, cover with top.

Option two - smile and dots:
- Cover the nail with the base color.Dry.
- Close-up dots to paint a smile using white varnish.
- Take the average dots. Make a line of dots parallel to the smile with white varnish.
- Allow to dry, cover with top.
French manicure can be combined with a lunar manicure, encircling not a smile, but a hole at the root of the nail plate.
How to make a French dots:
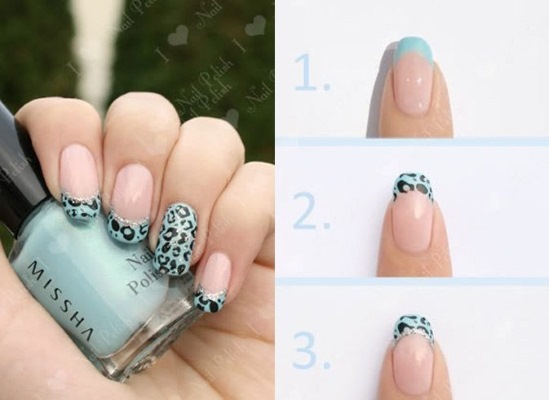
Lace
The most difficult, but also the most beautiful painting is imitation of lace on the nails. She is good both solo and as an element of the overall composition. So, a smile or a hole is often highlighted with a lace pattern, or applied to 1-2 nails, making a jacket on the remaining fingers.
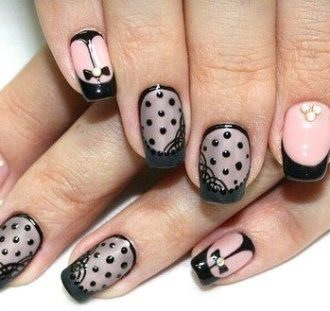
In total, there are 5 ways to depict the finest pattern:
- Drawing with a brush or dots.
- Drawing with a needle.
- Transfer the pattern using a slider or sticker.
- Stamping.
- Using real lace.
Step by step instructions on how to use a dots for lace nail design:
- Prepare a drawing scheme in advance. The main elements are a mesh of rhombuses, pentagons and hexagons, semicircular scales, and free-form curls. Larger elements: zags, points and semicircles. The center of the composition can be a diamond, a drop or a circle. But it is not necessary to draw a large detail, especially if a smile in French manicure will be decorated with lace painting.
- Treat nails, shape, polish, apply base and base. Allow to dry well.
- Patterns should be applied from large to small. First, place the main accents with large dots. Then draw dots and curls with a smaller ball. The final touch will be the creation of a mesh or small dots with the thinnest dotter. Before drawing new elements, you need to make sure that the previous ones are dry.
- Dry, cover with top.
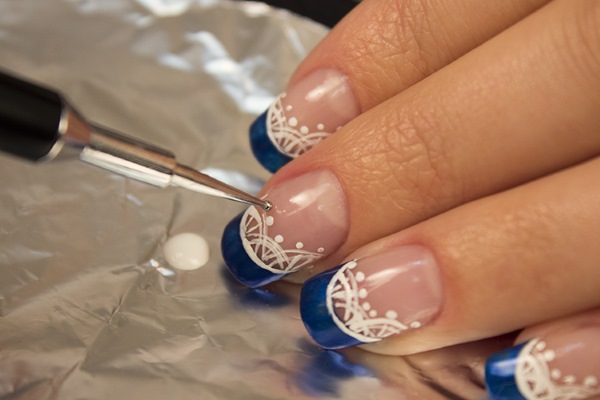
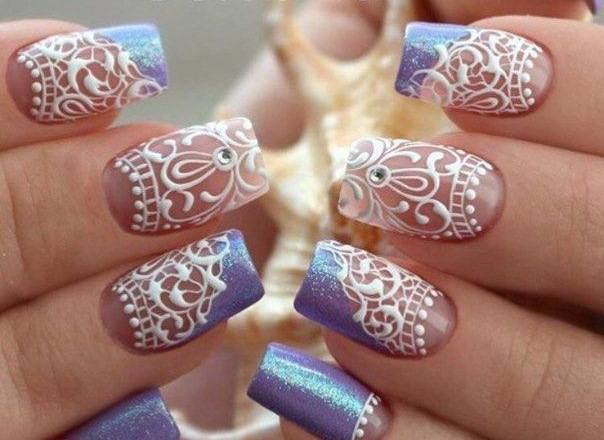
Lace made with acrylic paints looks the most elegant. They almost do not spread and allow you to make the most delicate painting. Ordinary varnish works well with dot patterns, a grid of rhombuses, various curls, lines and circles.
Other patterns
Below are a few more elements that are easy to draw using dots. By combining them, you can get original patterns.
Patterns:
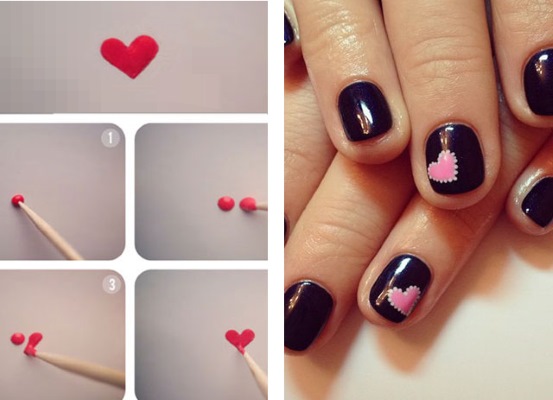
- Heart. With the help of a large dotter, place two dots at a short distance from each other. Then, with a small ball or toothpick, connect them and stretch them slightly downward, making a corner.

- Comma. Place a large point with a ball of large or medium diameter. Then make a tail with a thin tool.
- Point to point. Draw a large pea, let it dry. Put a smaller point in its middle with another color.
- Ring. It is easy to draw a circle with dots. A very interesting combination turns out when such a ring is partially overlapped by an ordinary dot.
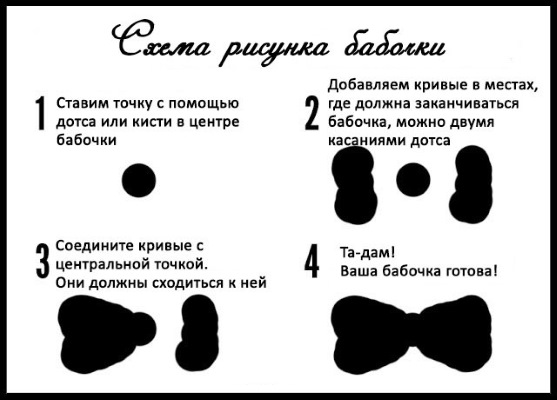
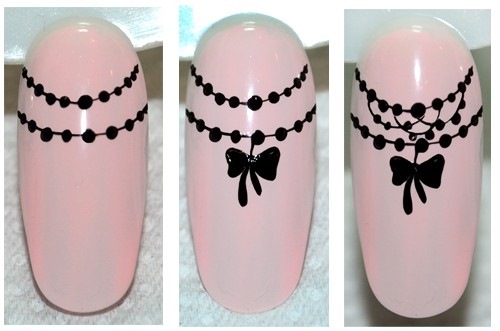
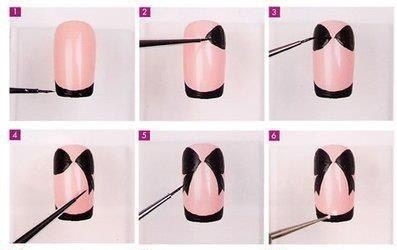
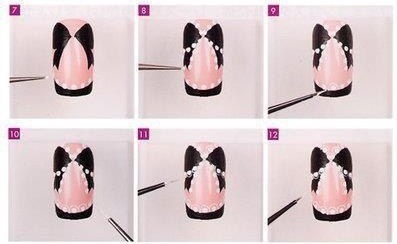
- Bow. For the picture, you need varnish in 2 matching colors. With varnish of the first color, place two large peas at a short distance from each other. Draw 2 smaller dots between them. Connect all 4 points with a thin dots or toothpick and adjust the shape. When the picture dries up, you can circle the bow along the contour with varnish of any contrasting color with a small dotter.


All of the above drawings can be depicted alone or in combination with each other. The possibilities of dots are limited only by the imagination of a fashionista.
Don't miss the most popular column article: How to build up your nails with gel polish. Instructions for nail extension for beginners. A photo.How to replace the instrument at home
You can pick up an alternative to the dotter from household items. It can be any item with a small, rounded tip: a toothpick, cotton swab, needle, eye pin, match, knitting needle or crochet hook, hairpin, ballpoint pen that has run out of ink.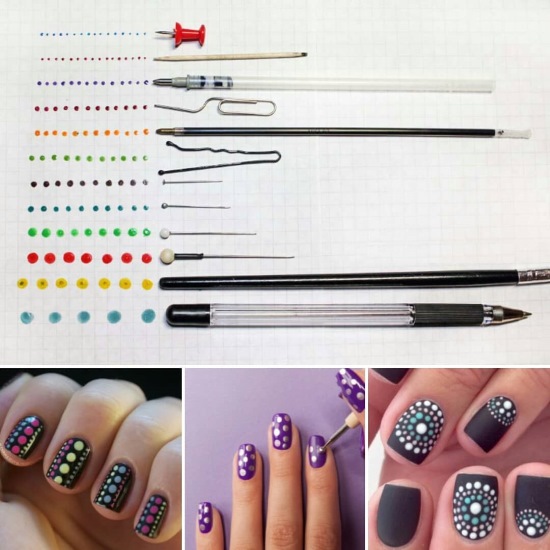
An effective and inexpensive tool is dots, which is convenient to use at home to create original nail designs. Although it can be replaced with improvised means, the patterns are more accurate with the dotter.
It is better to start painting on your nails with a simple point manicure, gradually moving on to more complex compositions - geometric patterns, flowers or lace.
Article design: Svetlana Ovsyanikova
Video on the topic: how to use dots for nail design
How to use dots in nail design:
Effective and fast dots nail design: